
WORDPRESS SEO • 25-STEP ACTION PLAN
Use this practical WordPress SEO checklist to improve crawlability, on-page relevance, technical performance and measurement. Each step explains why it matters, how to complete it and where to verify the recommendation.
New to the subject? Start with What Is SEO?, then return here and work through the checklist in order.
WordPress SEO Checklist at a Glance
| SEO phase | Steps | What you will improve |
|---|---|---|
| Technical foundations | 1–5 | Site visibility, permalinks, SEO plugin, sitemap and Search Console |
| On-page SEO | 6–13 | Titles, meta descriptions, headings, keywords, URLs, links and images |
| Technical SEO | 14–21 | Speed, mobile, HTTPS, broken links, schema, duplicates and Core Web Vitals |
| Growth and measurement | 22–25 | Content updates, backlinks, indexing and performance tracking |
Jump to a checklist step
- 1. Site visibility
- 2. WordPress permalink settings
- 3. SEO plugin
- 4. Create and submit XML sitemap
- 5. Search Console
- 6. Title tags
- 7. SEO meta descriptions
- 8. On-page SEO headings
- 9. Keywords
- 10. URLs
- 11. Internal links
- 12. Images
- 13. Alt text
- 14. Technical SEO and speed
- 15. Mobile
- 16. HTTPS
- 17. Broken links
- 18. WordPress schema markup
- 19. Categories and tags
- 20. Duplicate content
- 21. Core Web Vitals
- 22. Update content
- 23. Backlinks
- 24. Indexing
- 25. Rankings and traffic
1. Set Site Visibility
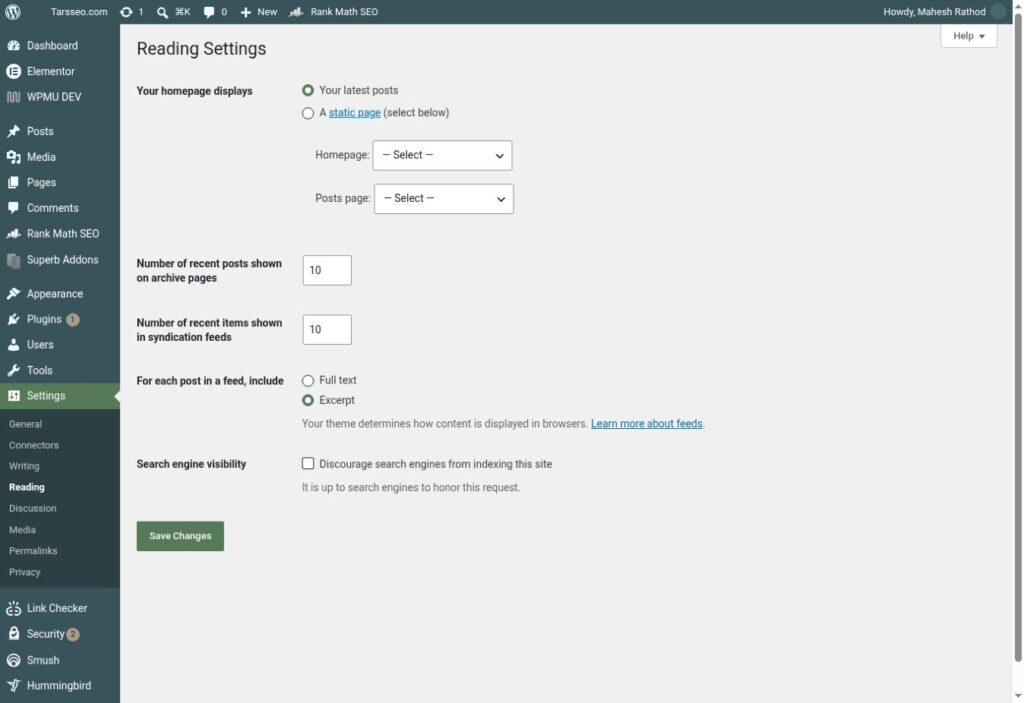
Before doing any SEO work, make sure your WordPress website is actually available for search engine indexing. WordPress has a Search Engine Visibility option that can add a noindex directive when enabled, so accidentally leaving it checked after development can prevent important pages from appearing in Google.
How to Check It
→ Step 1: Log in to your WordPress dashboard.
→ Step 2: Go to Settings → Reading.
→ Step 3: Scroll to Search Engine Visibility.
→ Step 4: Make sure “Discourage search engines from indexing this site” is unchecked.
→ Step 5: Click Save Changes.
Sources
WordPress — Reading Settings
Google — Technical Requirements for Search
2. Configure WordPress Permalink Settings
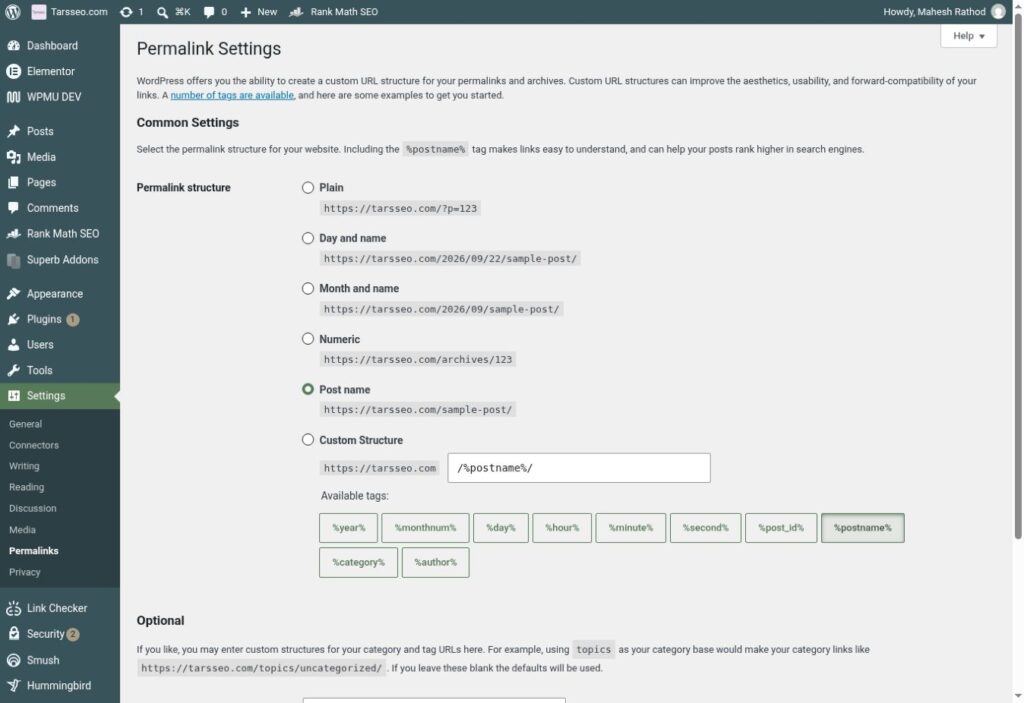
Permalinks are the permanent URLs WordPress creates for your posts and pages. Clear, descriptive URLs are easier for visitors to understand and give search engines additional context about the page, while Google recommends simple URL structures using readable words and hyphens.
How to Set WordPress Permalinks
→ Step 1: Go to Settings → Permalinks.
→ Step 2: Select Post name or another clean structure suitable for your website.
→ Step 3: Avoid unnecessarily complicated date, ID, or parameter-heavy URLs when they are not needed.
→ Step 4: Click Save Changes.
If your website is already established, don’t casually change existing URLs. Create proper permanent redirects from old URLs to the new versions so visitors and search engines do not hit broken pages.
| Permalink option | Example | SEO guidance |
|---|---|---|
| Post name | /sample-post/ | Usually the clearest option for content-led sites. |
| Date and name | /2026/09/sample-post/ | Useful for date-sensitive publishing, but longer. |
| Plain | /?p=123 | Avoid for public content because it lacks descriptive words. |
Sources
WordPress — Customize Permalinks
Google — URL Structure Best Practices
3. Install an SEO Plugin
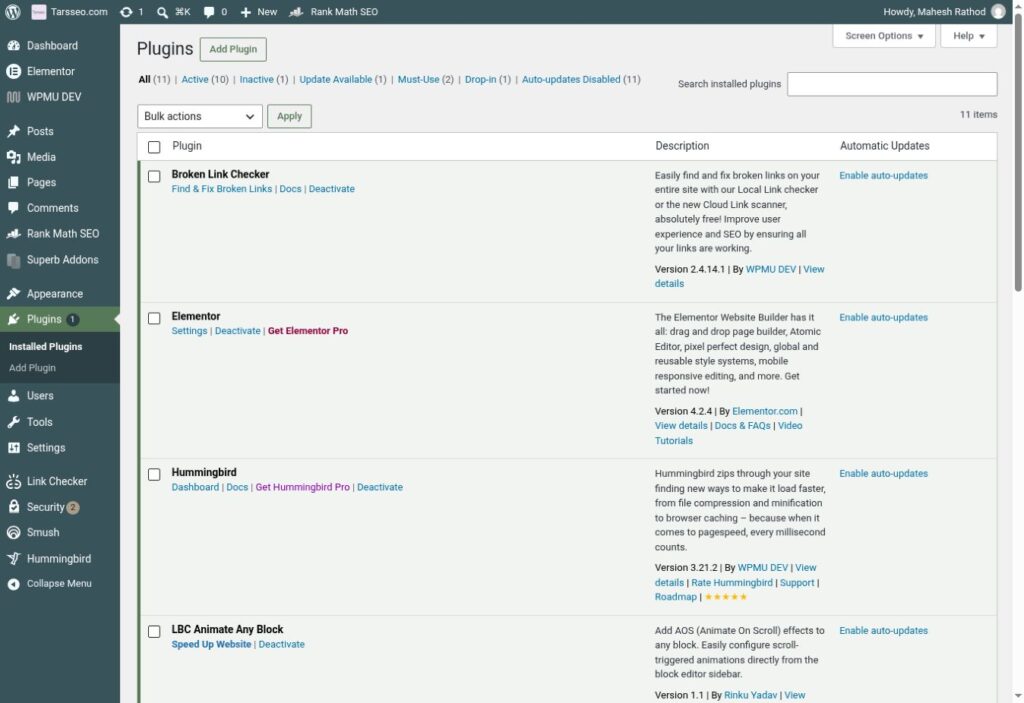
An SEO plugin gives WordPress users an easier way to control SEO elements such as title tags, meta descriptions, canonical URLs, XML sitemaps, and structured data without editing code manually. WordPress supports installing plugins directly through the dashboard, but the plugin itself does not automatically make a site rank well—the content and technical setup still need to follow search-engine best practices.
How to Install an SEO Plugin
→ Step 1: Go to Plugins → Add New Plugin.
→ Step 2: Search for a reputable SEO plugin such as Yoast SEO, Rank Math, or All in One SEO.
→ Step 3: Review its compatibility, updates, and documentation.
→ Step 4: Click Install Now.
→ Step 5: Click Activate.
→ Step 6: Complete the plugin’s initial SEO configuration.
Generally, use one full SEO plugin rather than several plugins trying to control the same SEO settings.
Sources
WordPress — Manage Plugins
Google — SEO Starter Guide
4. Create and Submit an XML Sitemap in WordPress
An XML sitemap gives search engines a structured list of URLs you want them to discover and crawl. Modern WordPress includes native XML sitemap functionality, and SEO plugins can also generate their own sitemap, but submitting one is only a discovery signal—it does not guarantee that every URL will be indexed.
| Sitemap source | Common URL | Use when |
|---|---|---|
| WordPress core | /wp-sitemap.xml | No SEO plugin is generating a replacement sitemap. |
| SEO plugin | /sitemap_index.xml | Your plugin manages indexable content and sitemap settings. |
How to Submit Your Sitemap
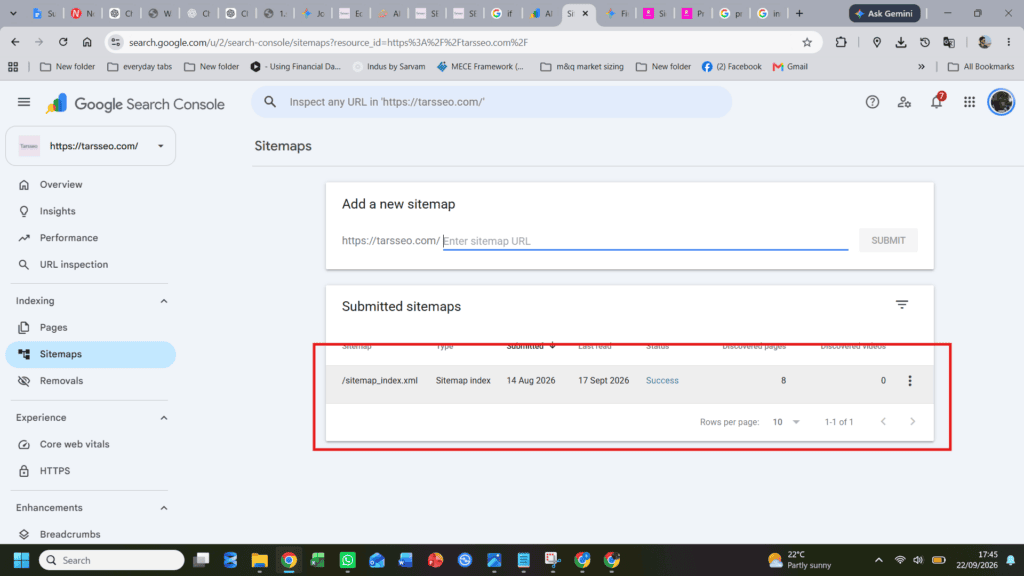
→ Step 1: Check which sitemap your website uses. Standard WordPress installations normally expose a sitemap index at /wp-sitemap.xml, while SEO plugins may use a different URL.
→ Step 2: Open Google Search Console.
→ Step 3: Select your website property.
→ Step 4: Go to Sitemaps.
→ Step 5: Enter your sitemap path.
→ Step 6: Click Submit.
→ Step 7: Check the report later for processing errors.
Sources
Google — Build and Submit a Sitemap
WordPress — Core XML Sitemaps
5. Connect Google Search Console
Google Search Console helps you understand how Google crawls, indexes, and displays your website in search results. It provides information about search queries, clicks, impressions, indexing problems, backlinks, Core Web Vitals, structured data, and many other SEO issues.
How to Connect Your Website
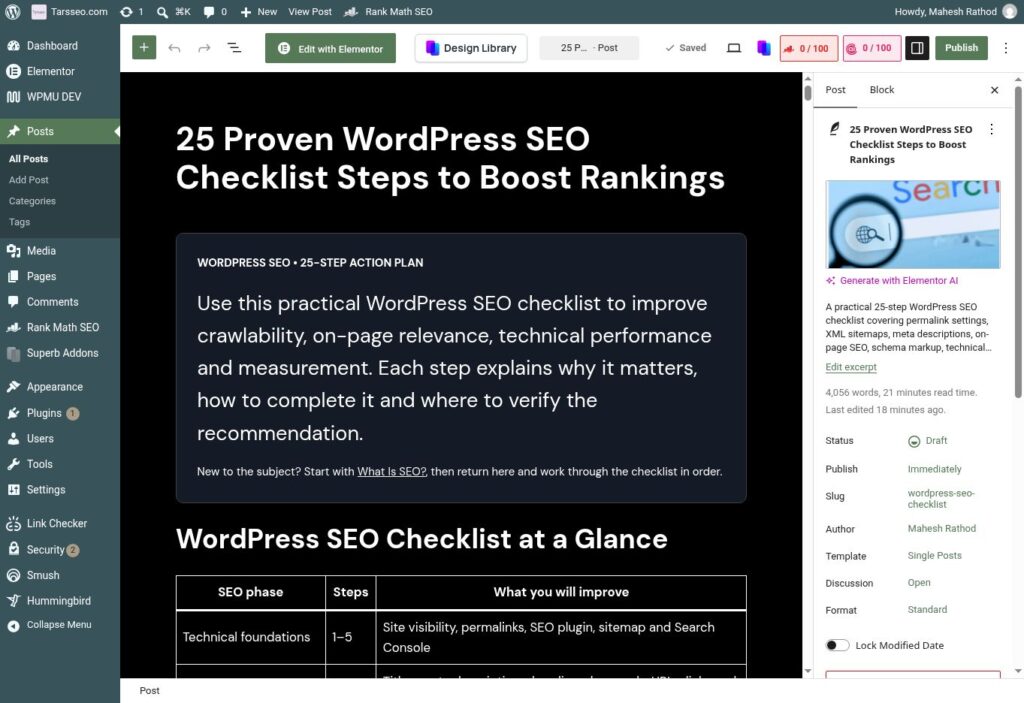
→ Step 1: Open Google Search Console.
→ Step 2: Click Add property.
→ Step 3: Choose either a Domain property or URL-prefix property.
→ Step 4: Enter your domain or website URL.
→ Step 5: Complete Google’s ownership verification.
A Domain property covers protocols and subdomains together but normally requires DNS verification. A URL-prefix property covers only the exact URL prefix you enter and supports additional verification methods.
Sources
Google — Add a Search Console Property
Google — Verify Site Ownership
6. Set Title Tags
The title tag helps Google and users understand the main subject of a page and can influence the clickable title shown in search results. Every important page should have a clear, descriptive, unique title, but remember that Google can generate title links from several page signals and may display something different from your exact <title> tag.
How to Set a Title in WordPress
→ Step 1: Open the post or page you want to optimize.
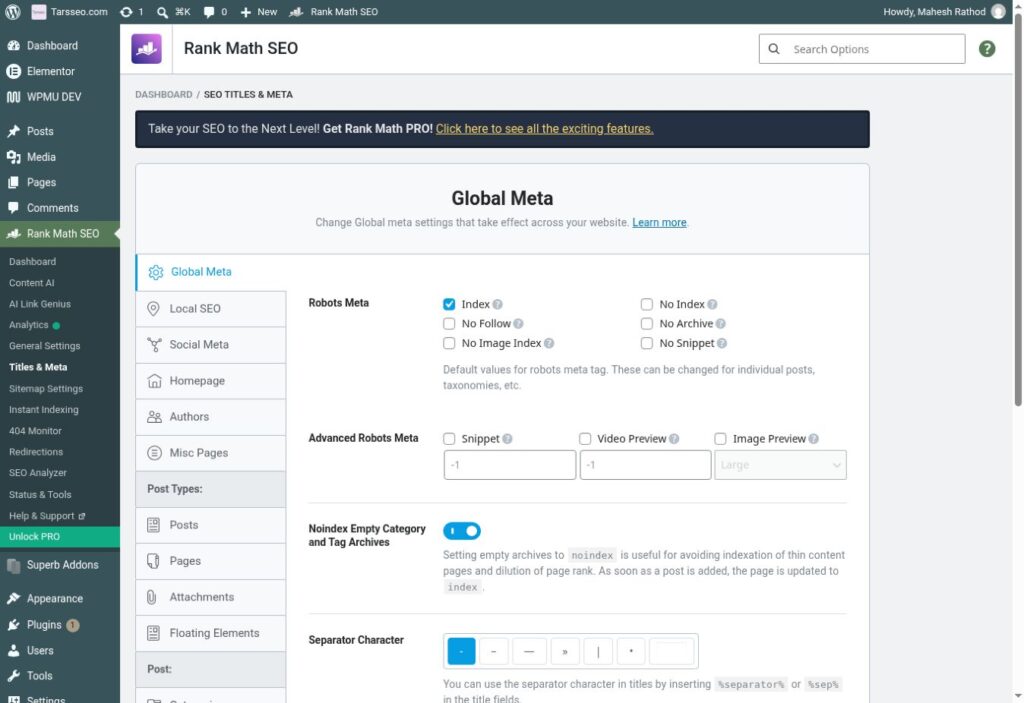
→ Step 2: Find your SEO plugin’s SEO settings.
→ Step 3: Locate the SEO Title or Title Tag field.
→ Step 4: Write a concise title that accurately describes the page.
→ Step 5: Include the primary topic or keyword naturally.
→ Step 6: Preview it and update the page.
Avoid repeating the same SEO title across many pages.
Sources
Google — Title Link Best Practices
Google — SEO Starter Guide
7. Write a WordPress SEO Meta Description
A meta description is a short summary that can help searchers understand what a page offers before clicking it. Google may use your meta description when generating a search snippet, but it can also create a different snippet from the page content depending on the user’s query, so descriptions should focus on relevance rather than forcing an exact SERP display.
How to Add a Meta Description
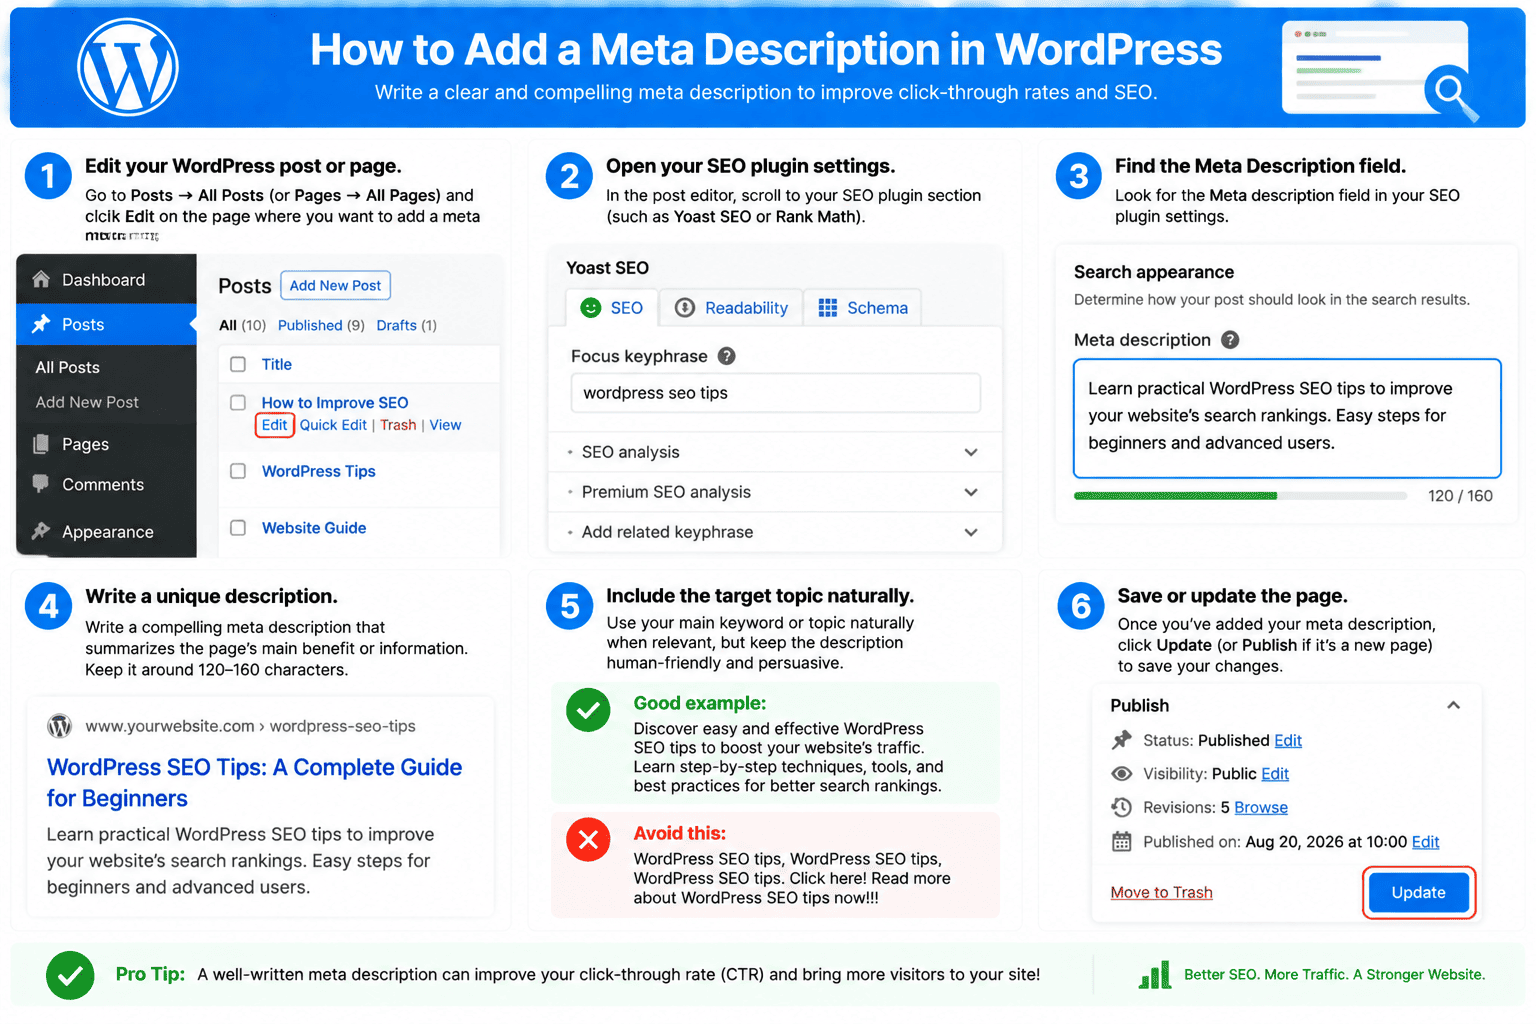
→ Step 1: Edit your WordPress post or page.
→ Step 2: Open your SEO plugin settings.
→ Step 3: Find the Meta Description field.
→ Step 4: Write a unique description summarizing the page’s main benefit or information.
→ Step 5: Include the target topic naturally when relevant.
→ Step 6: Save or update the page.
Google does not specify a fixed maximum meta-description length; search snippets can be truncated depending on the device and search query.
Sources
Google — Write Quality Meta Descriptions
Google — SEO Guide for Developers
8. On-Page SEO for WordPress: Optimize Headings
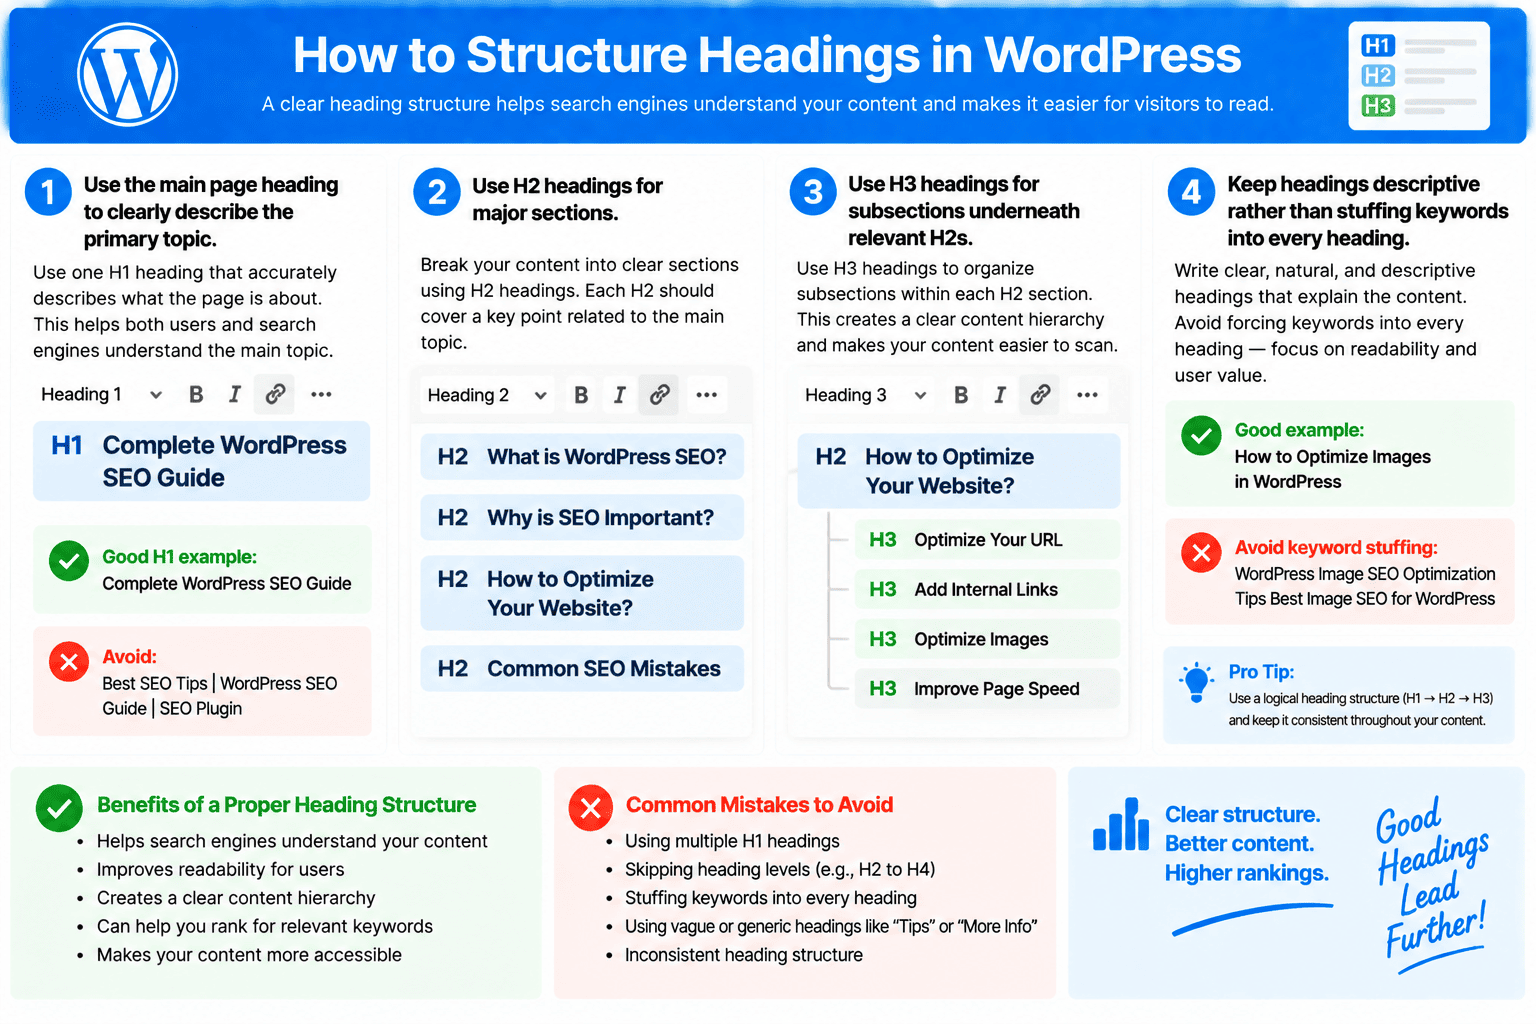
Headings make long content easier to scan and help readers understand how different sections relate to one another. Use descriptive headings to organize your content logically, but don’t obsess over heading order purely for Google rankings—Google has clarified that perfect semantic heading order is useful for accessibility but is not itself a Google Search requirement.
How to Structure Headings
→ Use the main page heading to clearly describe the primary topic.
→ Use H2 headings for major sections.
→ Use H3 headings for subsections underneath relevant H2s.
→ Keep headings descriptive rather than stuffing keywords into every heading.
In the WordPress block editor, select a Heading block and choose the appropriate heading level from its toolbar.
Sources
Google — SEO Starter Guide
Google — Heading Order SEO Clarification
9. Use Target Keywords Naturally
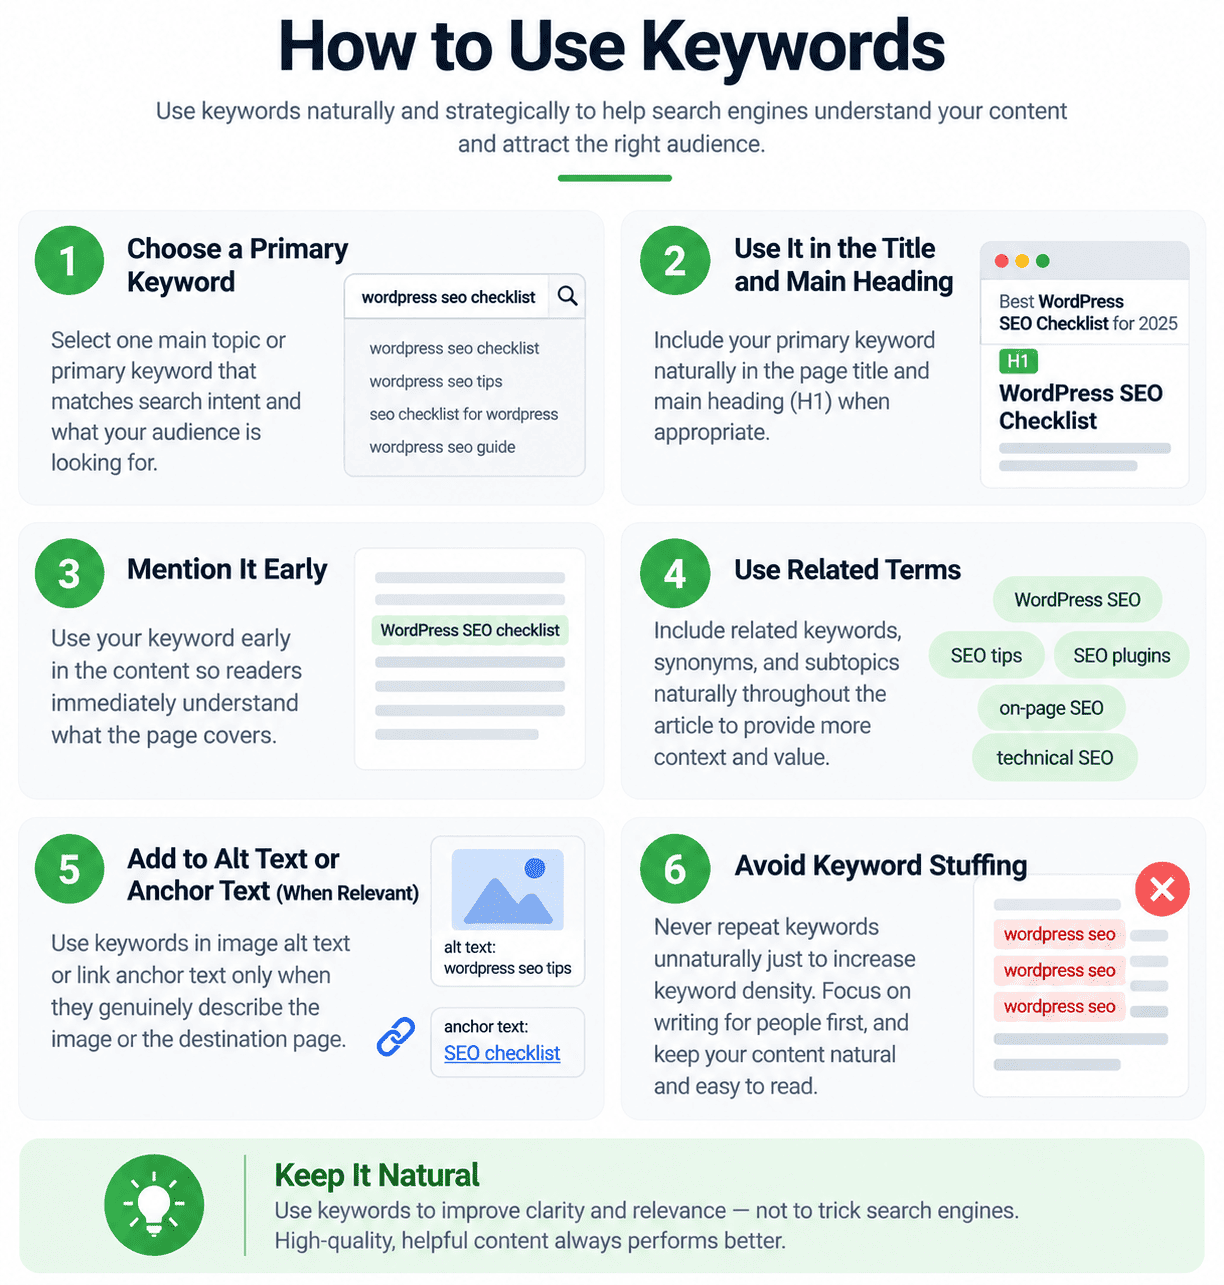
Target keywords help you align content with the words and topics your audience searches for. Google recommends using words people would naturally use to find your content in prominent locations, but modern search systems can understand related language, so forcing the exact keyword repeatedly is unnecessary and keyword stuffing can violate Google’s spam policies. personally i use semrush i download the top keyword including primary keyword and based on my analysis i write content around that.
How to Use Keywords
→ Choose one main topic or primary keyword that matches search intent.
→ Include it naturally in the title and main heading when appropriate.
→ Mention the topic early enough that readers immediately understand what the page covers.
→ Use related terms and subtopics naturally throughout the article.
→ Add keywords to alt text or anchor text only when they genuinely describe the image or destination page.
→ Never repeat keywords simply to increase keyword density.
Sources
Google — Search Essentials
Google — SEO Starter Guide
10. Optimize URLs
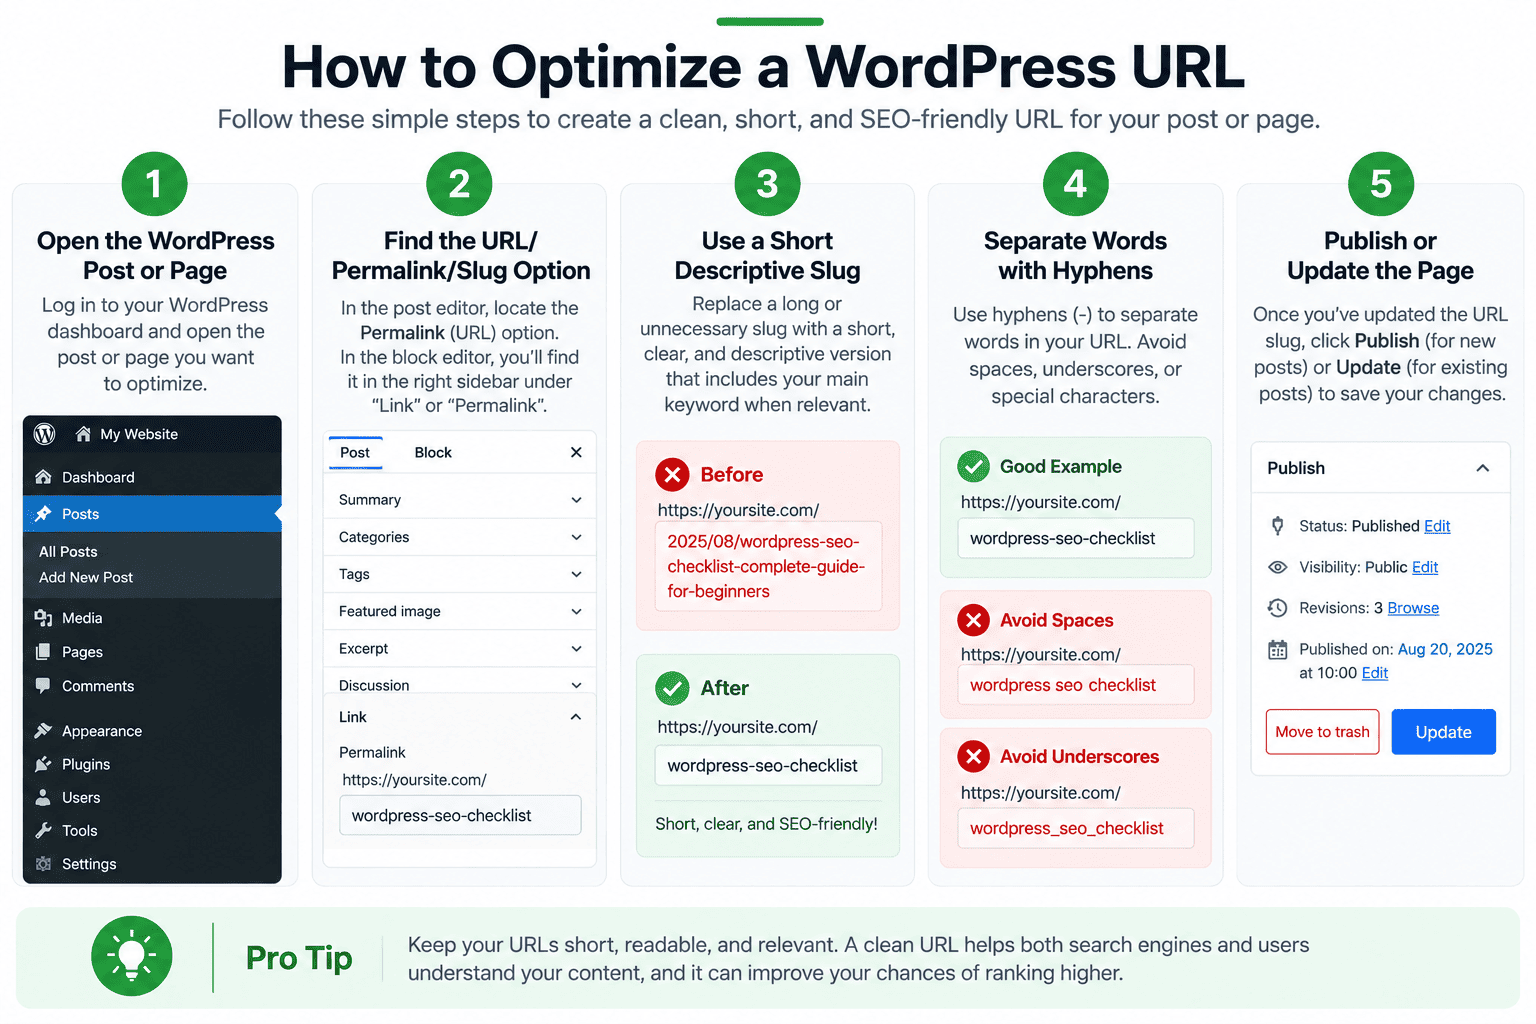
A useful URL should be simple, readable, and descriptive enough for users to understand what the destination page is about. Google recommends using understandable words, hyphens between words, and avoiding unnecessary parameters or overly complex URL structures.
How to Optimize a WordPress URL
→ Step 1: Open the WordPress post or page.
→ Step 2: Find the URL/Permalink/Slug option.
→ Step 3: Replace an unnecessarily long slug with a short descriptive version.
→ Step 4: Separate words with hyphens.
→ Step 5: Publish or update the page.
Whenever possible, finalize the URL before publishing. If you change the URL of an already indexed page, redirect the old URL to the appropriate new URL.
Sources
Google — URL Structure Best Practices
WordPress — Customize Permalinks
11. Add Internal Links
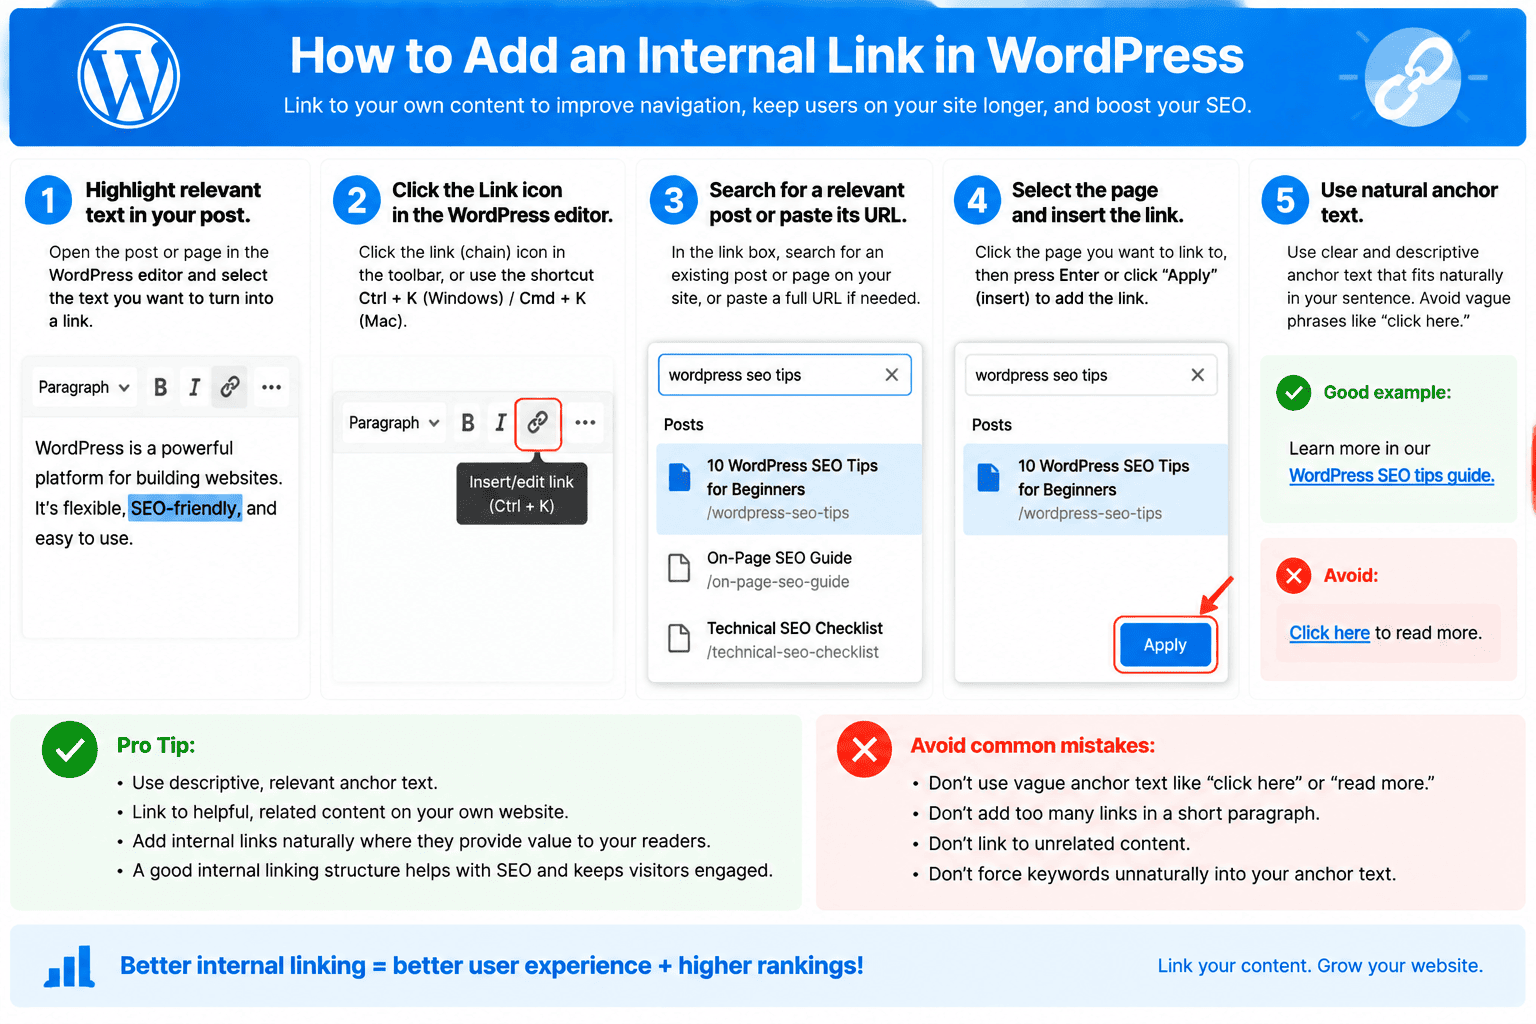
Internal links connect related pages within your website and help both readers and search engines discover additional useful content. Google recommends ensuring important pages receive links from other pages on your website and using descriptive anchor text that clearly explains the destination.
How to Add an Internal Link in WordPress
→ Step 1: Highlight relevant text in your post.
→ Step 2: Click the Link icon in the WordPress editor.
→ Step 3: Search for a relevant post or paste its URL.
→ Step 4: Select the page and insert the link.
→ Step 5: Use natural anchor text instead of vague phrases such as “click here.”
Only add links when they genuinely help readers understand the topic or discover relevant information.
Sources
Google — Link Best Practices
Google — SEO Starter Guide
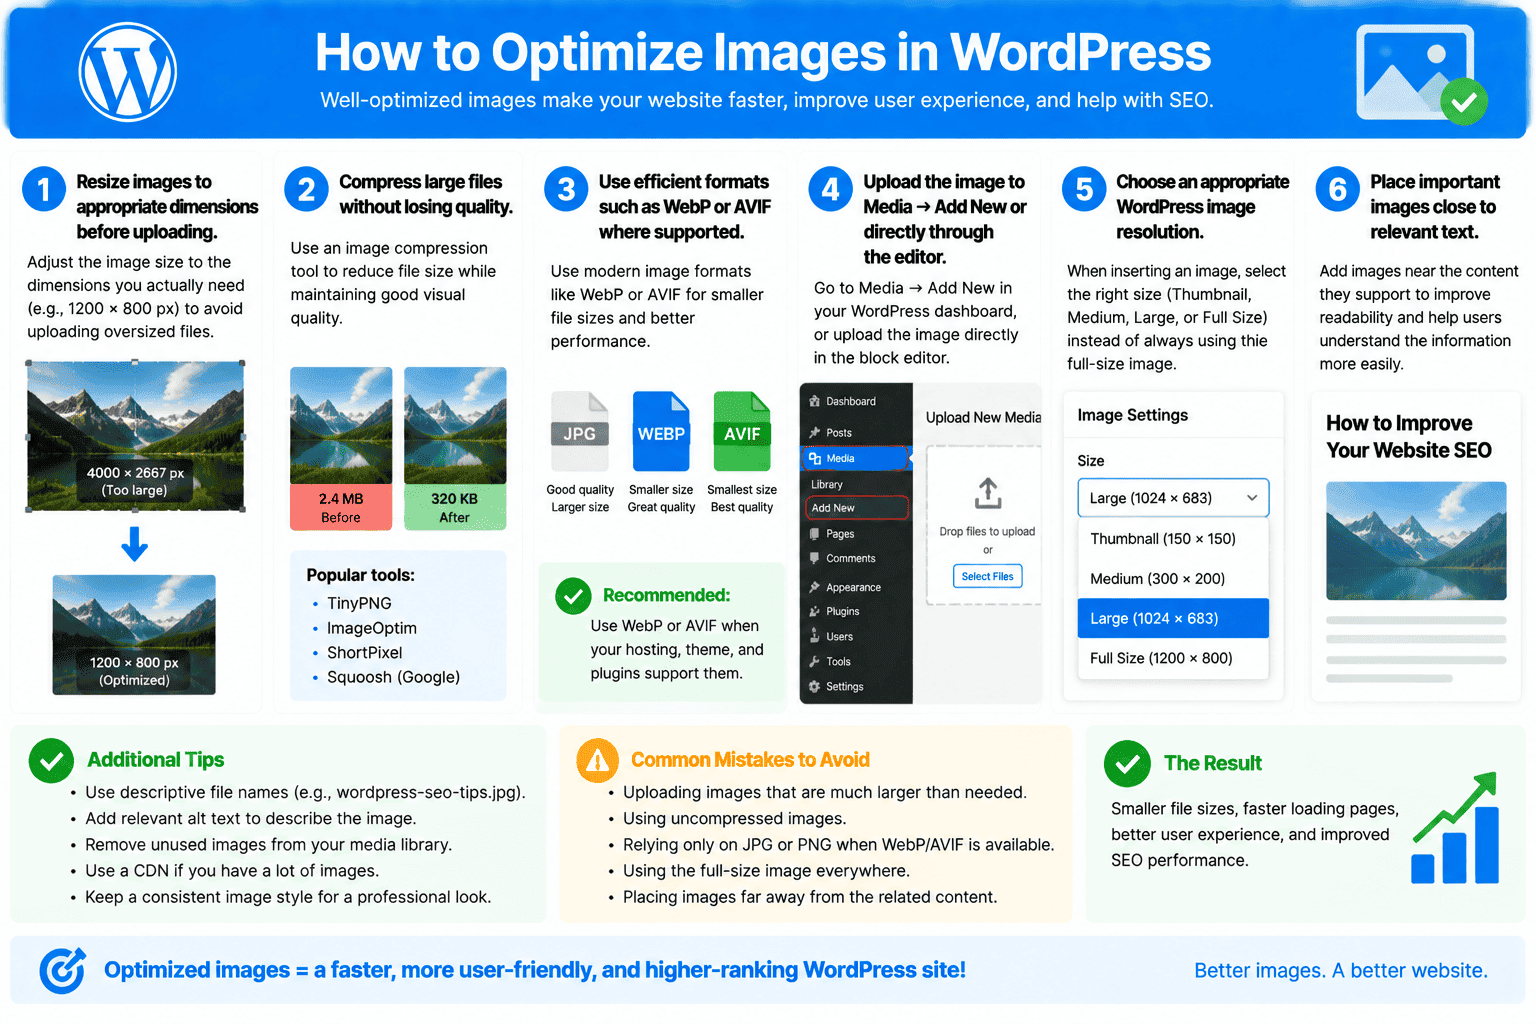
12. Optimize Images
Large or poorly prepared images can slow pages down, while properly optimized images can improve loading performance and make content easier to discover through Google Images. Use appropriately sized, clear images near relevant text and avoid uploading unnecessarily huge files when visitors will only see a much smaller version. personally i compress my all pictures i add them all in one folder and then use free image compressor you can compress 1 mp image to least 350kb which is eas the loading time for your website. use the link for that site i use daily.
How to Optimize Images
→ Resize images to appropriate dimensions before uploading when possible.
→ Compress large files without noticeably damaging quality.
→ Use efficient formats such as WebP or AVIF where your setup supports them.
→ Upload the image to Media → Add New or directly through the editor.
→ Choose an appropriate WordPress image resolution rather than always loading the full-size image.
→ Place important images close to relevant text.
Sources
Google — Image SEO Best Practices
WordPress — Using Images
13. Add Alt Text
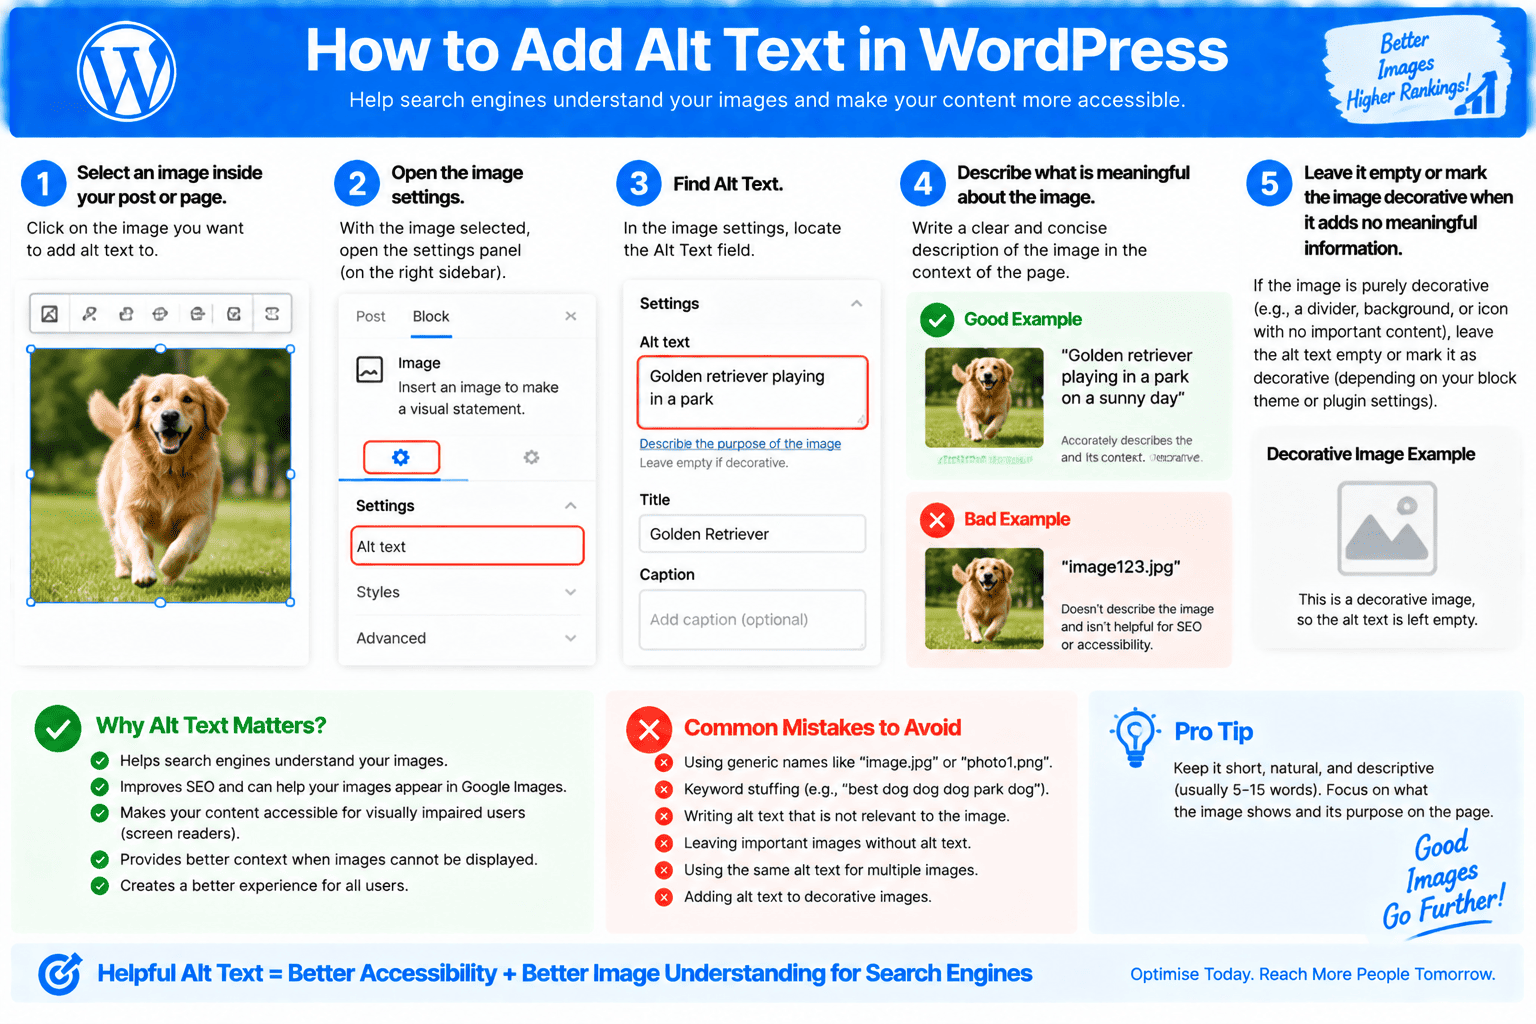
Alt text describes the purpose or content of an image for users who cannot see it and also provides search engines with useful context about the image. Good alt text should be concise and descriptive rather than stuffed with keywords, while purely decorative images can be left with an empty alt attribute or marked decorative.
How to Add Alt Text in WordPress
→ Step 1: Select an image inside your WordPress post or page.
→ Step 2: Open the image settings.
→ Step 3: Find Alt Text.
→ Step 4: Describe what is meaningful about the image in the context of the page.
→ Step 5: Leave it empty or mark the image decorative when it adds no meaningful information.
You can also edit default image alt text through the Media Library.
Sources
Google — SEO Starter Guide: Image Alt Text
WordPress — Image Block Documentation
14. Technical SEO for WordPress: Improve Site Speed
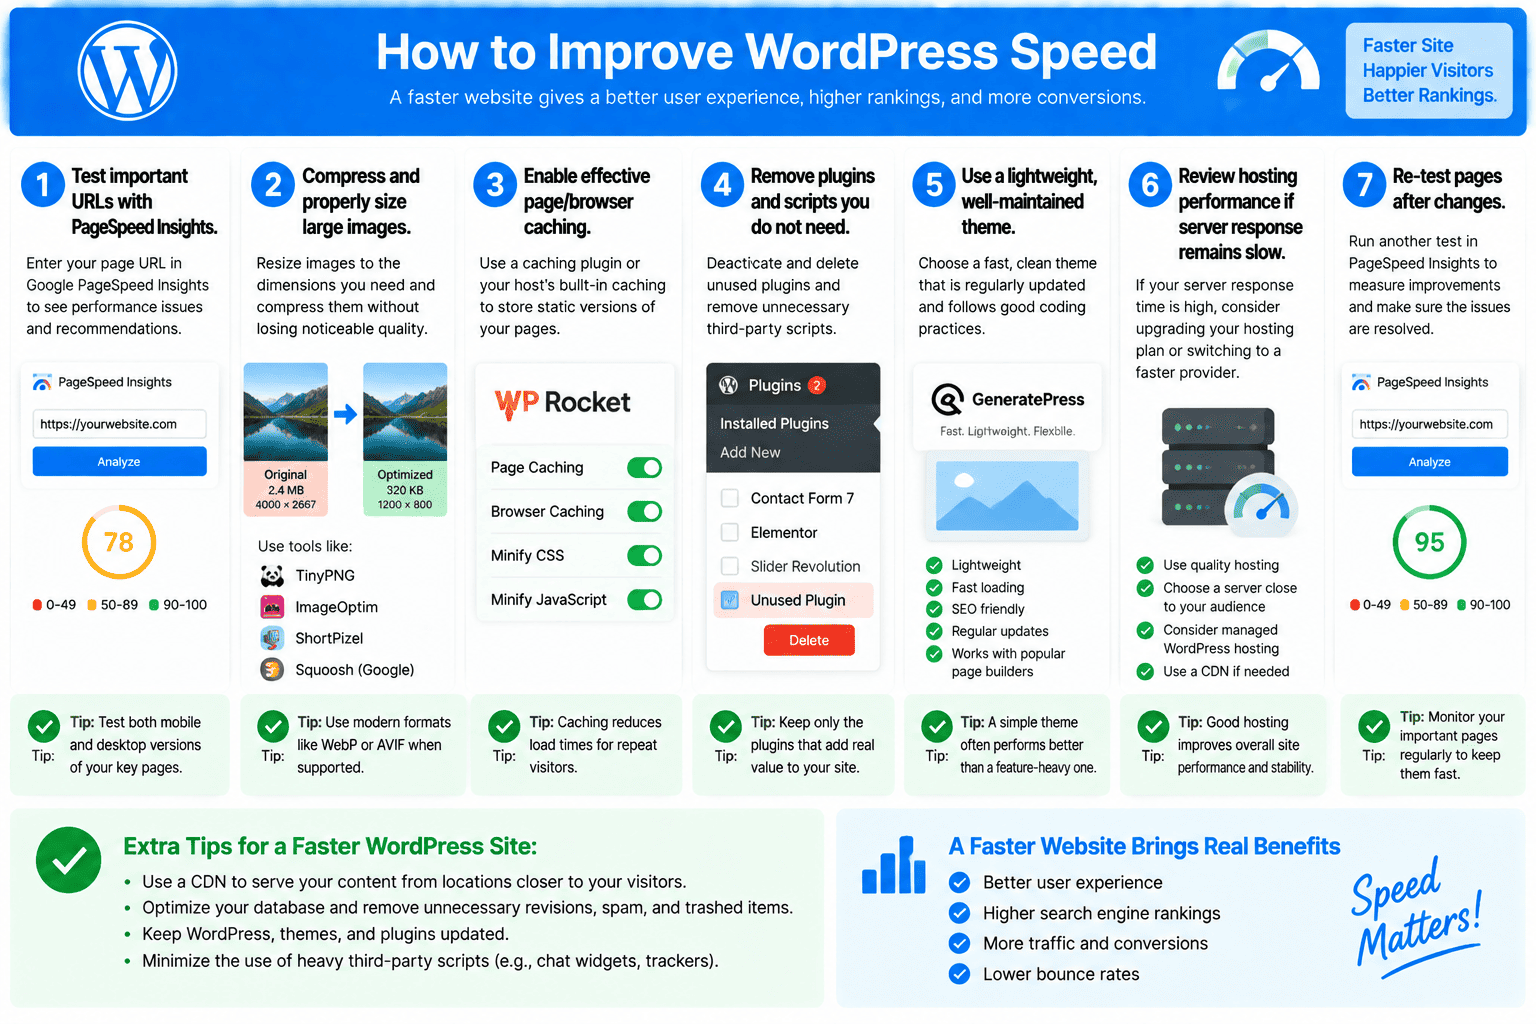
Site speed directly affects how quickly users can access and interact with your content, making it an important part of overall page experience. Google recommends maintaining a fast, secure, accessible website and provides PageSpeed Insights and Core Web Vitals data to help identify performance problems.
How to Improve WordPress Speed
→ Step 1: Test important URLs with PageSpeed Insights.
→ Step 2: Compress and properly size large images.
→ Step 3: Enable effective page/browser caching through your host or caching solution.
→ Step 4: Remove plugins and scripts you genuinely do not need.
→ Step 5: Use a lightweight, well-maintained theme.
→ Step 6: Review hosting performance if server response remains slow.
→ Step 7: Re-test pages after changes instead of assuming an optimization worked.
Sources
Google — Technical SEO and Page Experience
Google — Core Web Vitals
15. Make Your Site Mobile-Friendly
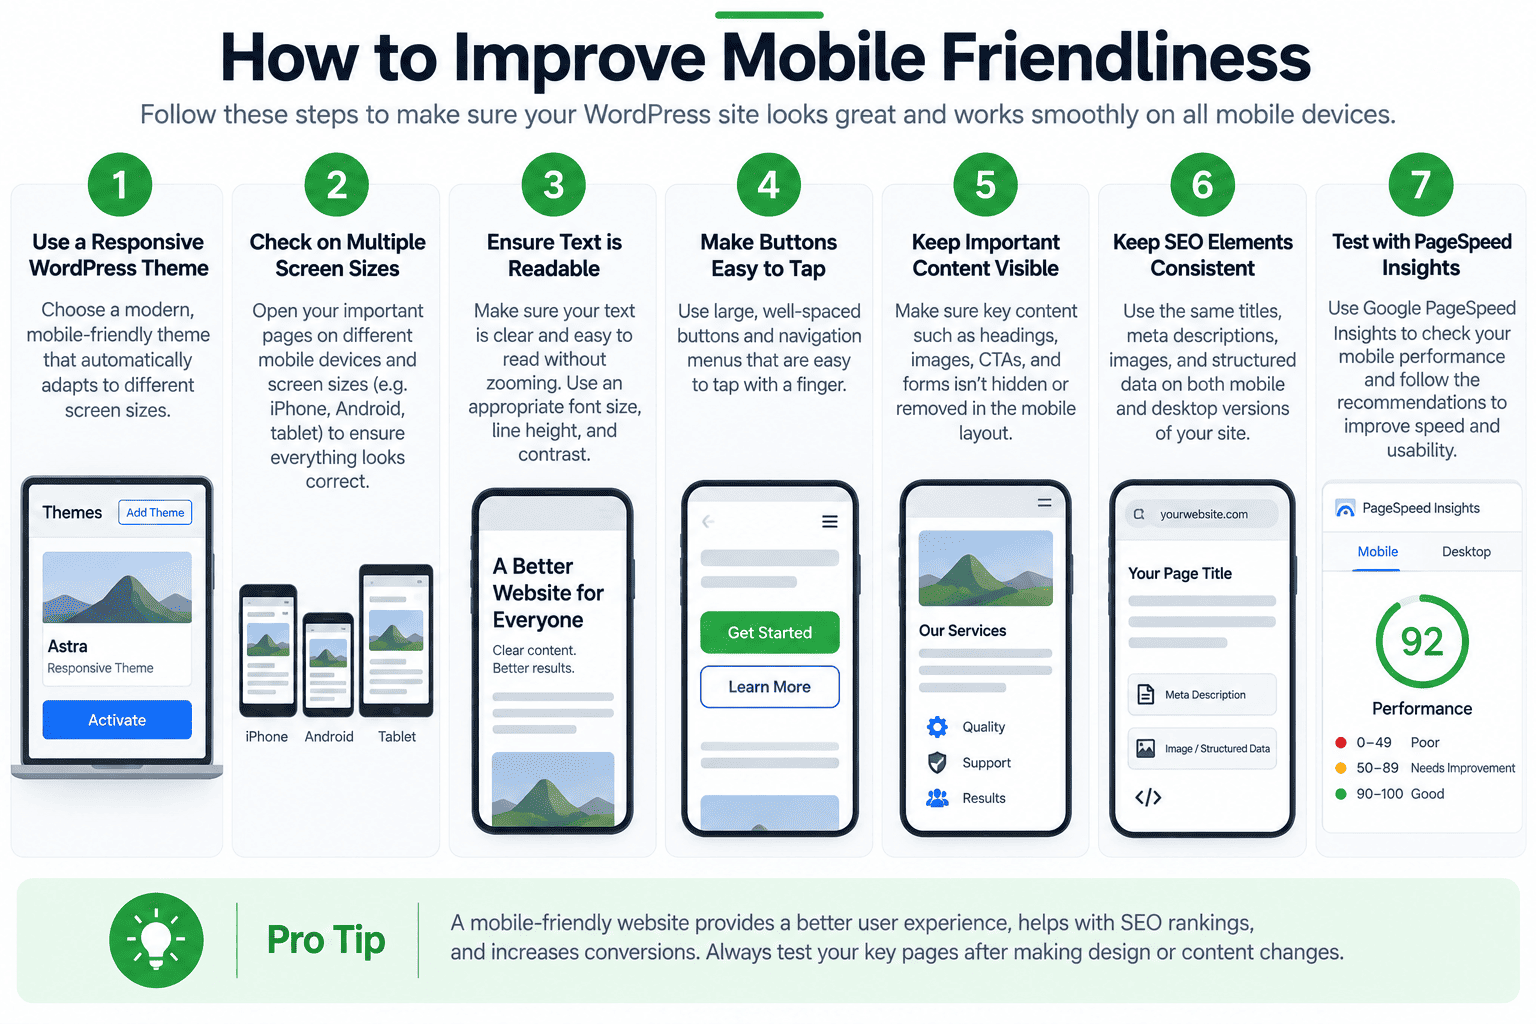
Google uses the mobile version of website content for indexing and ranking, so your mobile experience should contain the same important content and SEO information as desktop. Responsive web design is Google’s recommended configuration because the same URL and HTML can adapt to different screen sizes.
How to Improve Mobile Friendliness
→ Use a responsive WordPress theme.
→ Open your important pages on multiple mobile screen sizes.
→ Check that text is readable without zooming.
→ Make buttons and navigation easy to tap.
→ Make sure important content isn’t removed from the mobile layout.
→ Keep titles, meta information, images, and structured data consistent across mobile and desktop.
→ Test mobile page performance with PageSpeed Insights.
Sources
Google — Mobile-First Indexing Best Practices
Google — Page Experience Guidance
16. Use HTTPS
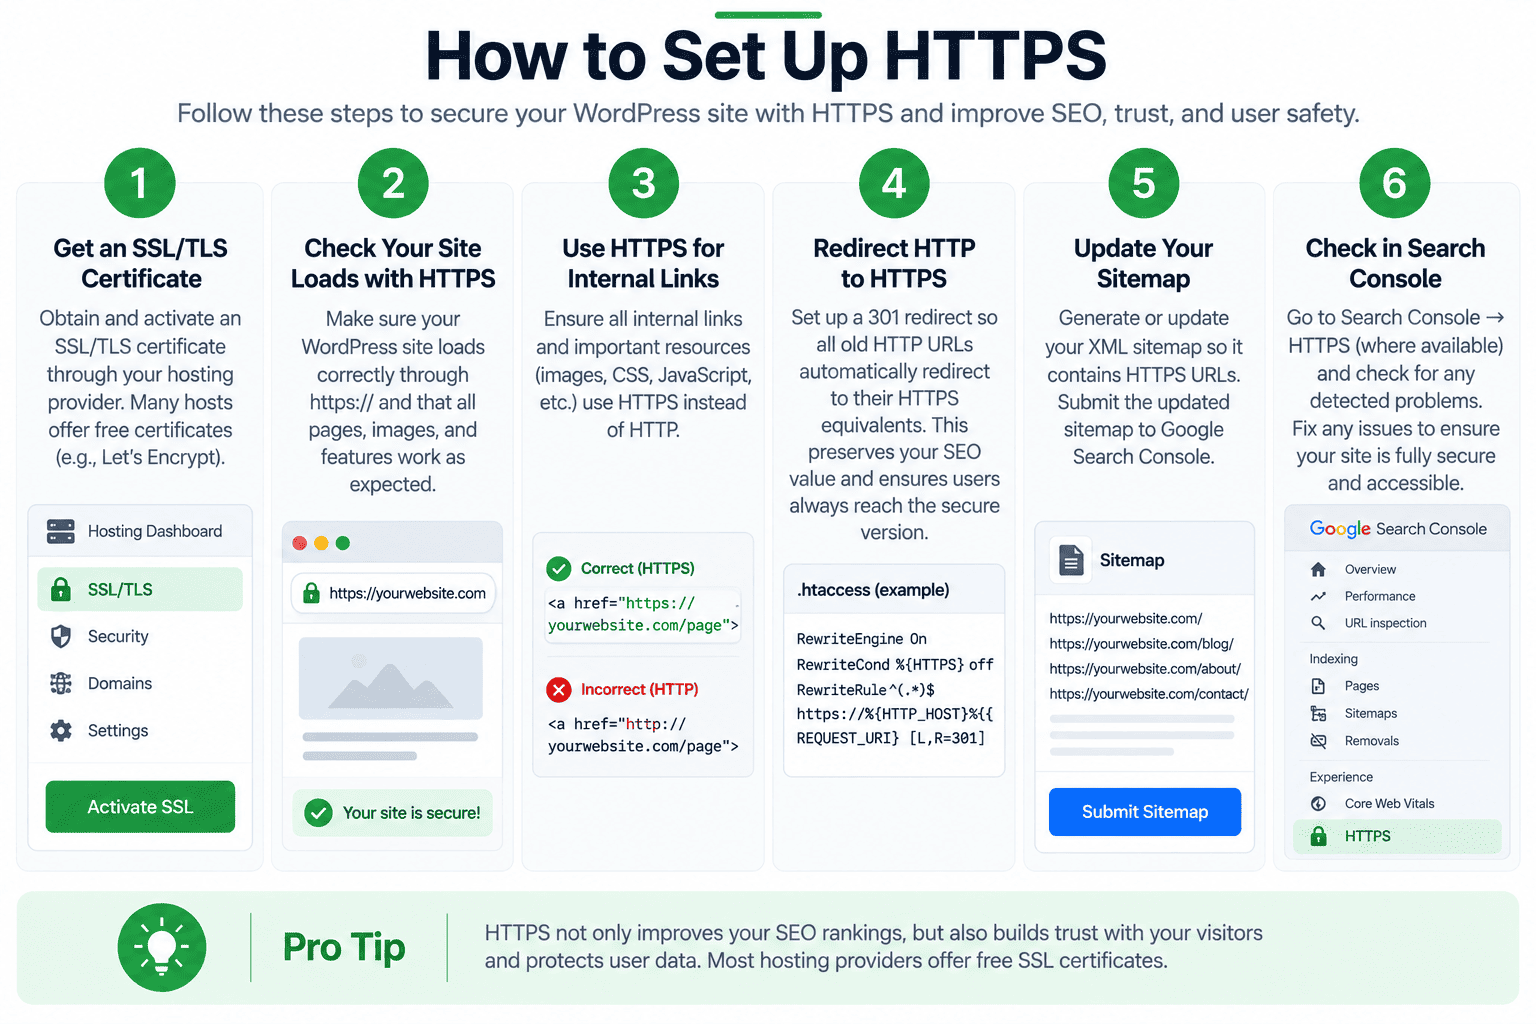
HTTPS encrypts information transferred between a visitor and your website and is now a basic expectation for a secure website. Google strongly recommends HTTPS, and Search Console provides an HTTPS report that can help identify indexed HTTP URLs or problems with HTTPS versions.
How to Set Up HTTPS
→ Step 1: Obtain and activate an SSL/TLS certificate through your hosting provider.
→ Step 2: Make sure your WordPress site loads correctly through https://.
→ Step 3: Ensure internal links and important resources use HTTPS.
→ Step 4: Redirect old HTTP URLs to their HTTPS equivalents.
→ Step 5: Update your sitemap so it contains HTTPS URLs.
→ Step 6: Check Search Console → HTTPS for detected problems where the report is available.
Sources
Google — HTTPS Report
Google — Technical SEO Guidance
17. Fix Broken Links
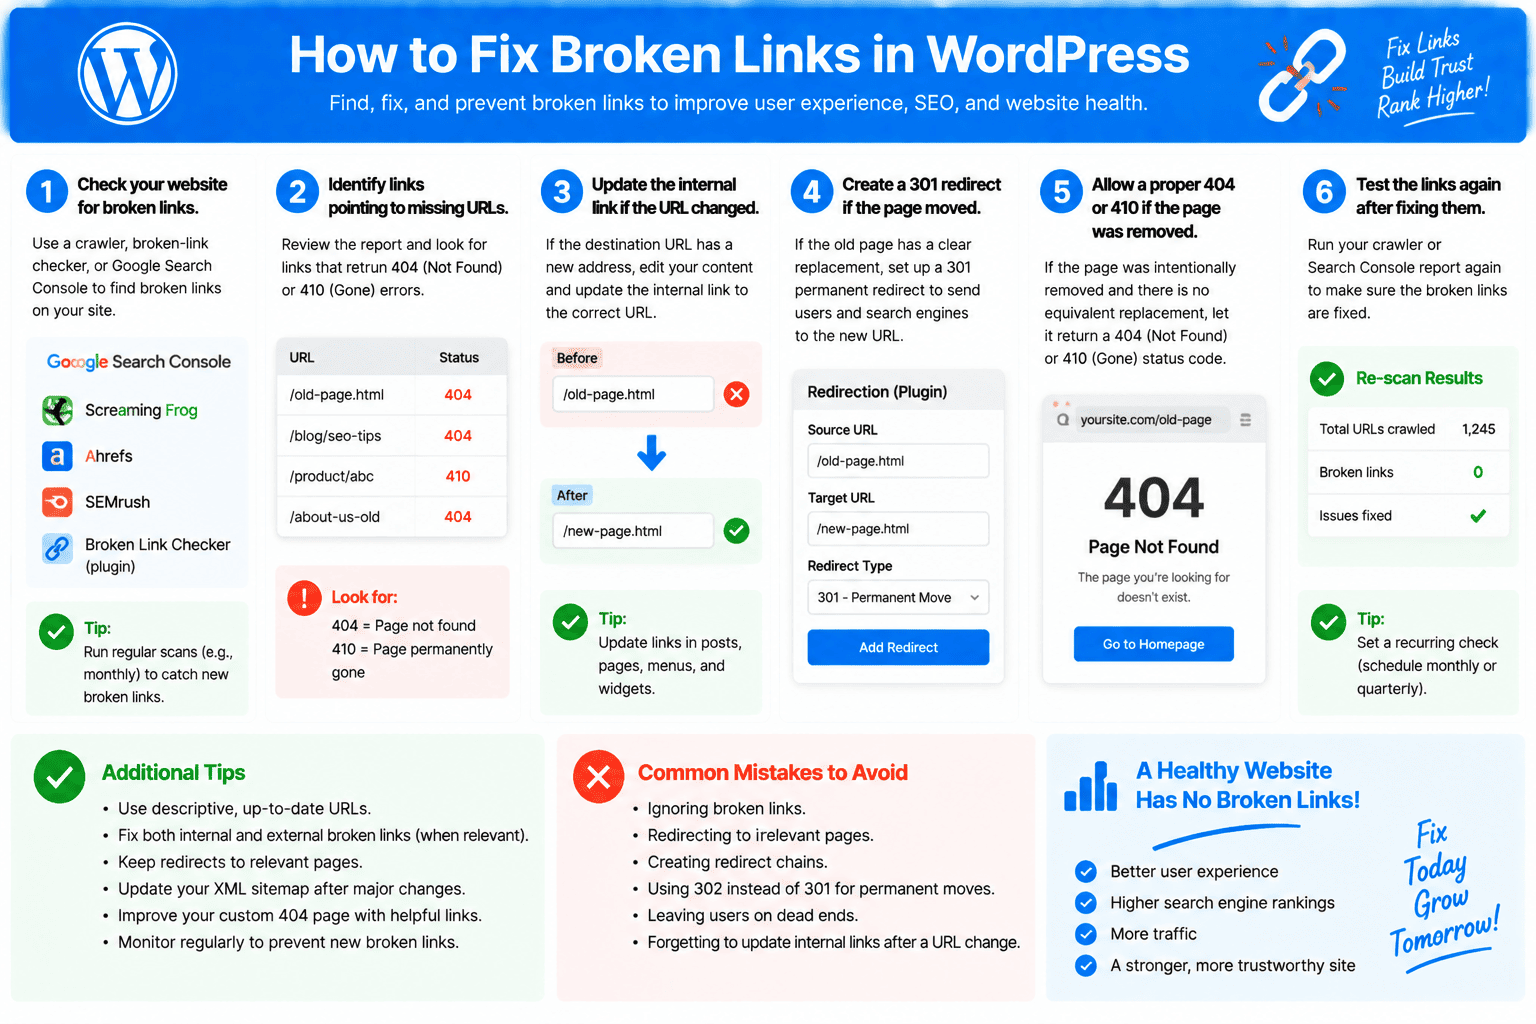
Broken links can frustrate visitors and prevent them from reaching useful content, so they should be reviewed as part of regular website maintenance. However, not every 404 needs a redirect: if a page has permanently disappeared and has no suitable replacement, returning a proper 404 is valid; if content moved, redirect users to the correct replacement.
How to Fix Broken Links
→ Step 1: Check your website using a crawler, broken-link checker, or Search Console indexing reports.
→ Step 2: Identify links pointing to missing URLs.
→ Step 3: If the destination URL changed, update the internal link.
→ Step 4: If the old page moved to a clear replacement, create a 301 permanent redirect.
→ Step 5: If the page was intentionally removed with no equivalent replacement, allow a proper 404 or 410 response.
→ Step 6: Test the links again after fixing them.
Sources
Google — Troubleshoot Crawling Errors
Google — Link Best Practices
18. Add WordPress Schema Markup
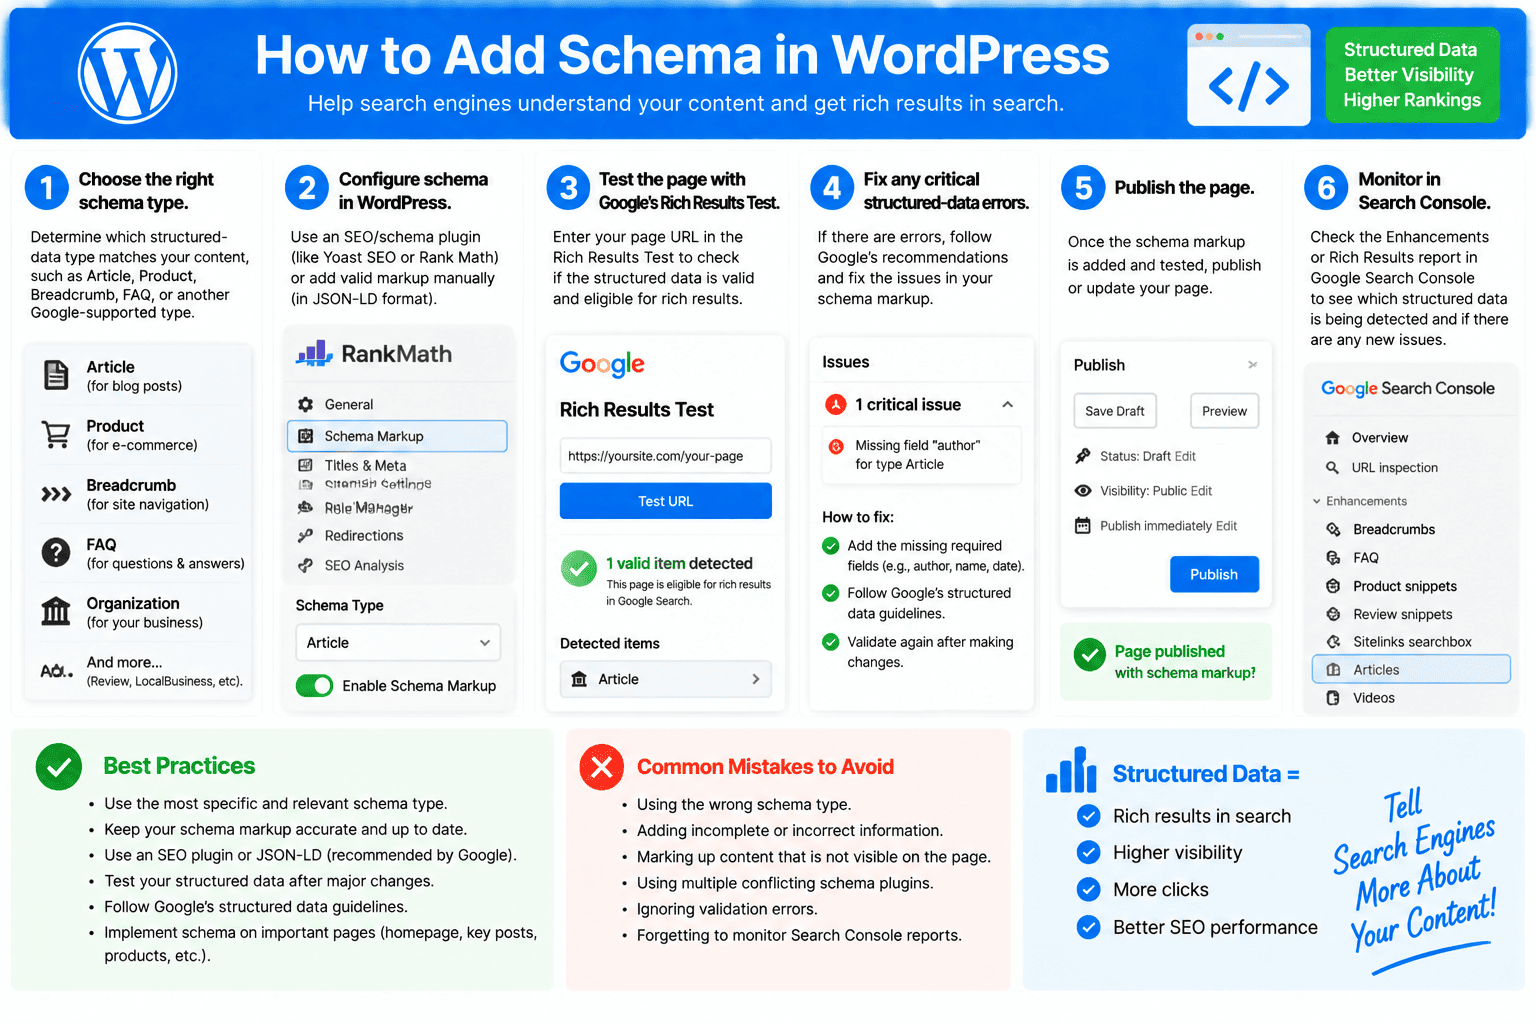
Schema markup, also called structured data, gives search engines explicit information about the meaning and type of content on a page. Valid structured data can make eligible pages available for certain rich-result features, but adding schema does not guarantee that Google will display a rich result.
| Page type | Relevant schema | Important note |
|---|---|---|
| Blog post | Article / BlogPosting | Match author, dates and visible article information. |
| Product page | Product | Only include genuine visible product details. |
| Navigation trail | BreadcrumbList | Keep markup consistent with visible breadcrumbs. |
| Local business page | LocalBusiness subtype | Use accurate business details and the closest valid subtype. |
How to Add Schema in WordPress
→ Step 1: Determine which structured-data type actually matches your content, such as Article, Product, Breadcrumb, or another Google-supported type.
→ Step 2: Configure it through your SEO/schema plugin or implement valid markup manually.
→ Step 3: Test the page using Google’s Rich Results Test.
→ Step 4: Fix critical structured-data errors.
→ Step 5: Publish the page.
→ Step 6: Monitor eligible structured-data reports inside Search Console when available.
Do not add schema describing content or information that isn’t genuinely present on the page.
Sources
Google — Introduction to Structured Data
Google — Search Console Rich Result Reports
19. Optimize Category and Tag Pages
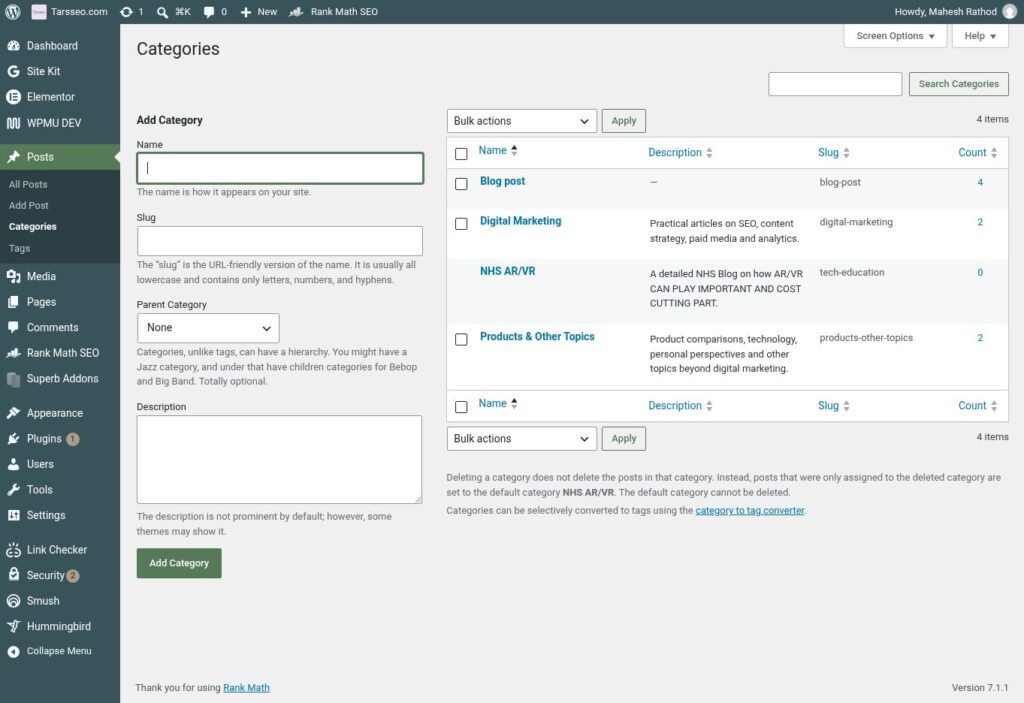
WordPress categories and tags group related posts and can help visitors navigate a website more easily. Useful archive pages can strengthen site organization, but automatically generating large numbers of thin, overlapping, or nearly duplicate taxonomy pages can create unnecessary URLs, so only keep indexable archives that provide genuine value.
How to Optimize Them
→ Step 1: Go to Posts → Categories or Posts → Tags.
→ Step 2: Keep categories focused on important recurring topics.
→ Step 3: Avoid creating a new tag for every minor keyword variation.
→ Step 4: Add useful descriptions or supporting content to important archive pages if your theme displays them.
→ Step 5: Remove or consolidate unnecessary overlapping taxonomies.
→ Step 6: If an archive provides little search value, consider setting it to noindex through your SEO settings instead of automatically indexing every archive.
Sources
WordPress — Taxonomies
Google — Using Noindex
20. Avoid Duplicate Content
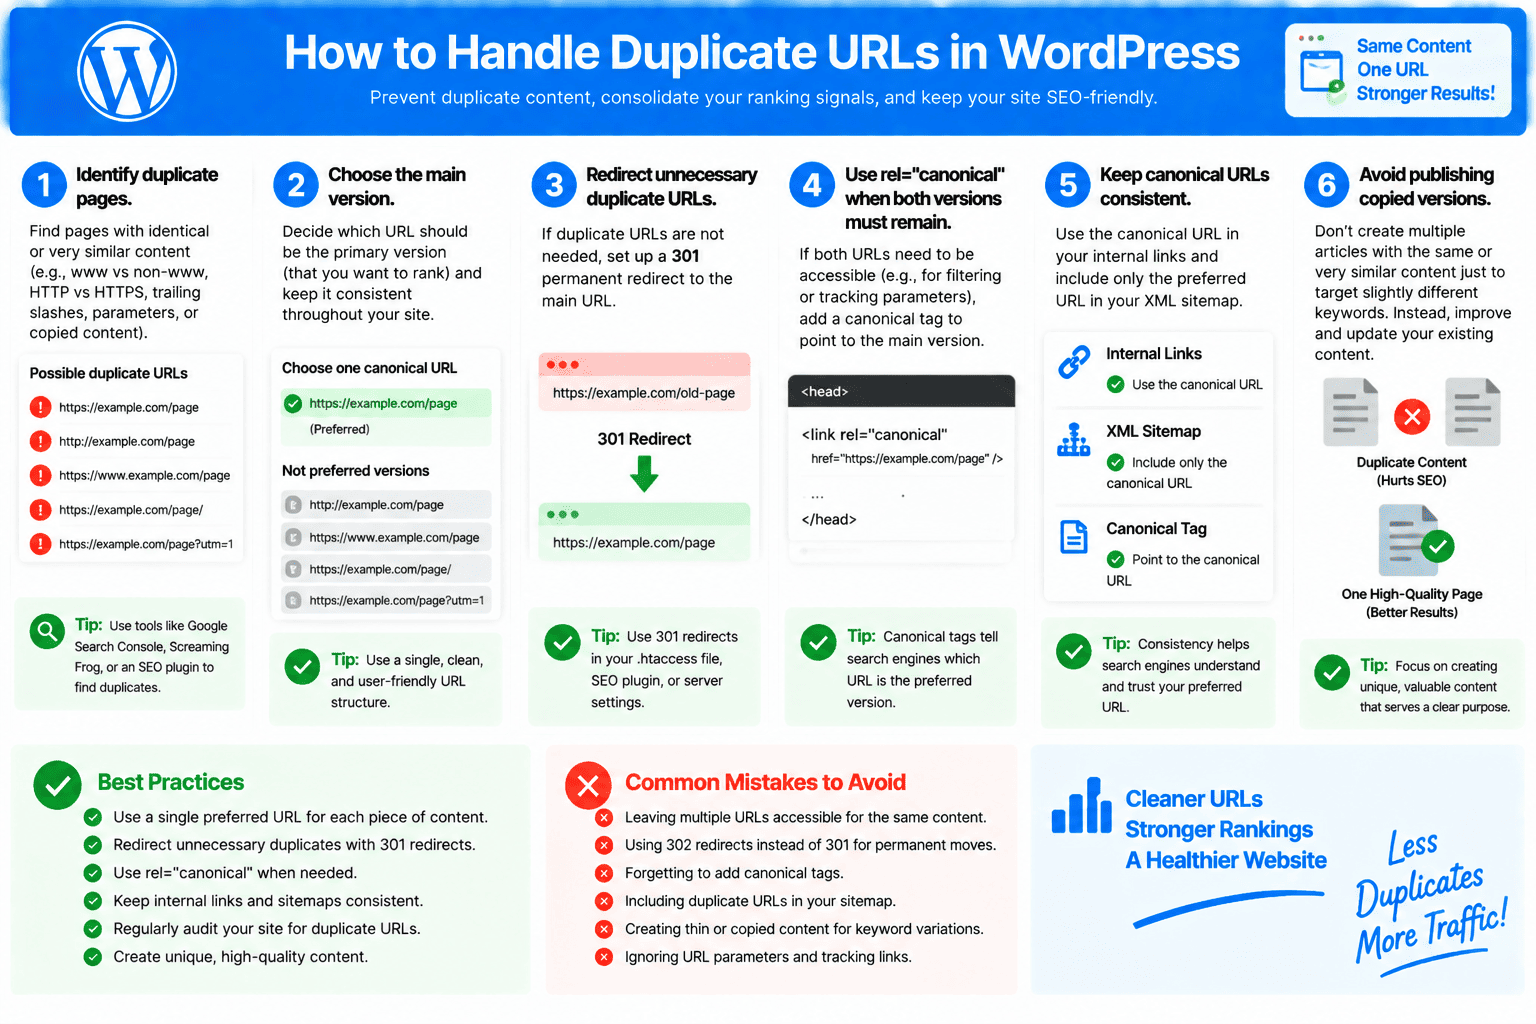
Duplicate content occurs when identical or very similar content is accessible through multiple URLs. Google can normally choose a representative canonical URL itself, but unnecessary duplicates can confuse users and waste crawling resources, so important pages should have clear, consistent canonical versions.
How to Handle Duplicate URLs
→ Identify pages containing identical or nearly identical information.
→ Choose the URL you want treated as the main version.
→ Redirect unnecessary duplicate URLs when they no longer need to exist.
→ If both versions must remain accessible, use the appropriate rel="canonical" signal.
→ Keep canonical URLs consistent in internal links and your XML sitemap.
→ Avoid publishing copied versions of existing articles simply to target slightly different keyword variations.
Sources
Google — Canonicalization
Google — Specify Canonical URLs
21. Improve Core Web Vitals
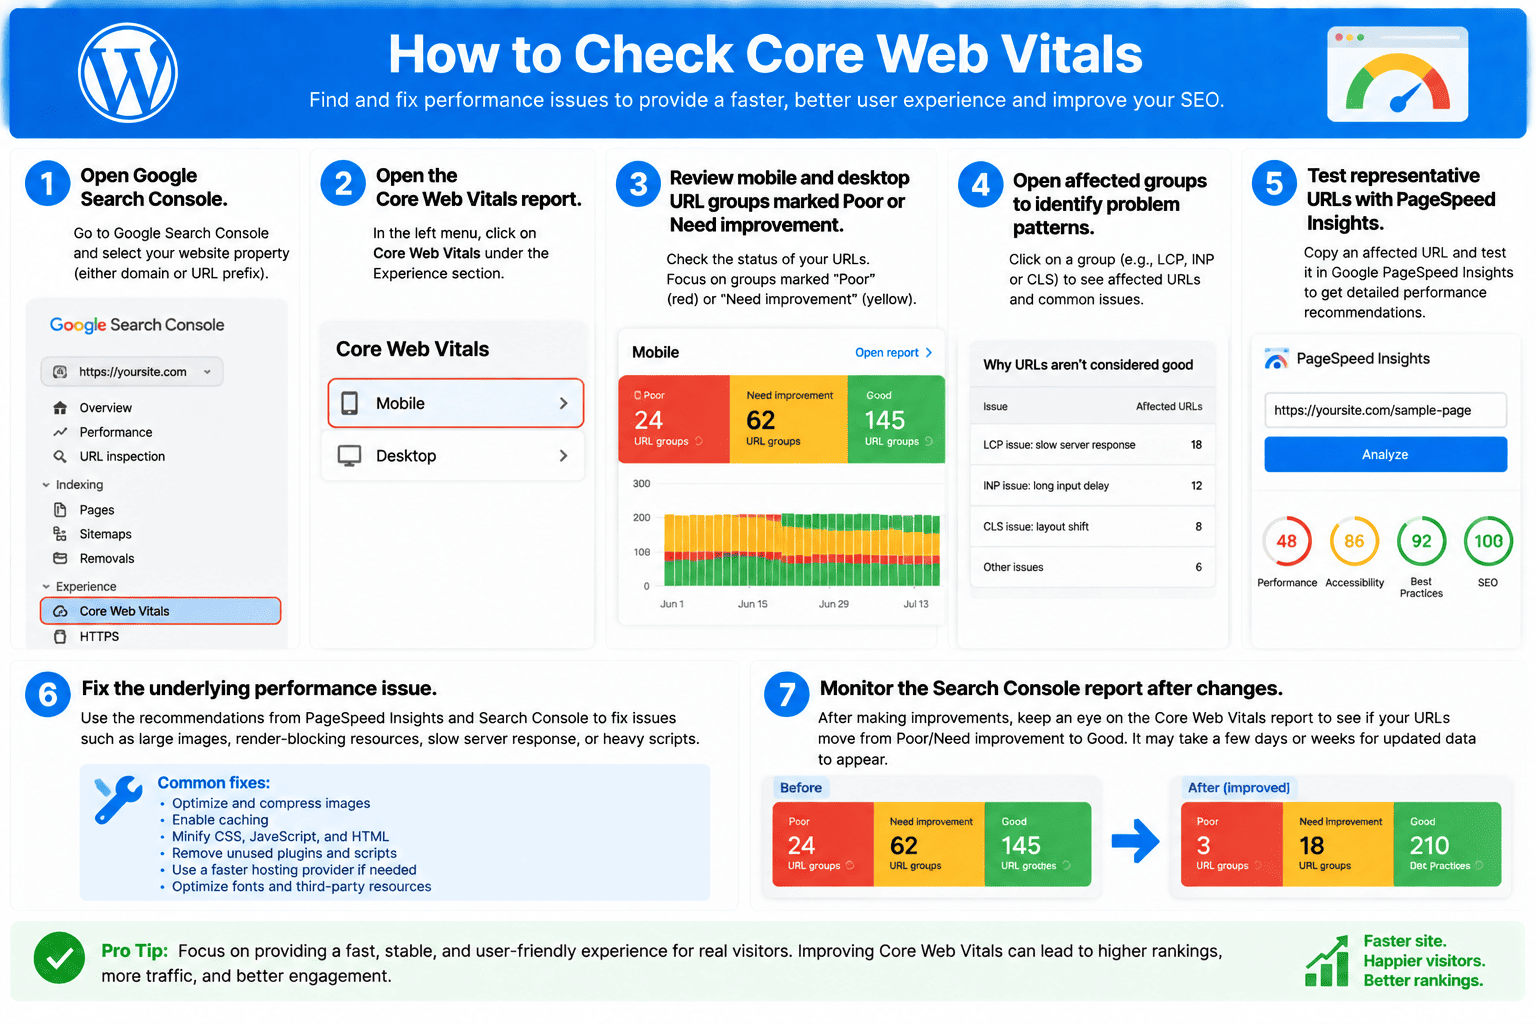
Core Web Vitals measure important parts of real-world page experience: Largest Contentful Paint (LCP) for loading, Interaction to Next Paint (INP) for responsiveness, and Cumulative Layout Shift (CLS) for visual stability. Google recommends good Core Web Vitals for users and Search, but they should be treated as part of the overall page experience rather than a single shortcut to higher rankings.
Google’s current “good” thresholds are approximately LCP within 2.5 seconds, INP below 200 ms, and CLS below 0.1.
How to Check Core Web Vitals
→ Step 1: Open Google Search Console.
→ Step 2: Open the Core Web Vitals report.
→ Step 3: Review mobile and desktop URL groups marked Poor or Need improvement.
→ Step 4: Open affected groups to identify problem patterns.
→ Step 5: Test representative URLs with PageSpeed Insights.
→ Step 6: Fix the underlying performance issue.
→ Step 7: Monitor the Search Console report after changes.
Sources
Google — Understanding Core Web Vitals
Google — Search Console Core Web Vitals Report
22. Update Old Content
SEO should not end when an article is published. Google recommends reviewing previously published content and updating it when necessary, especially when information, statistics, screenshots, links, products, instructions, or recommendations have become outdated.
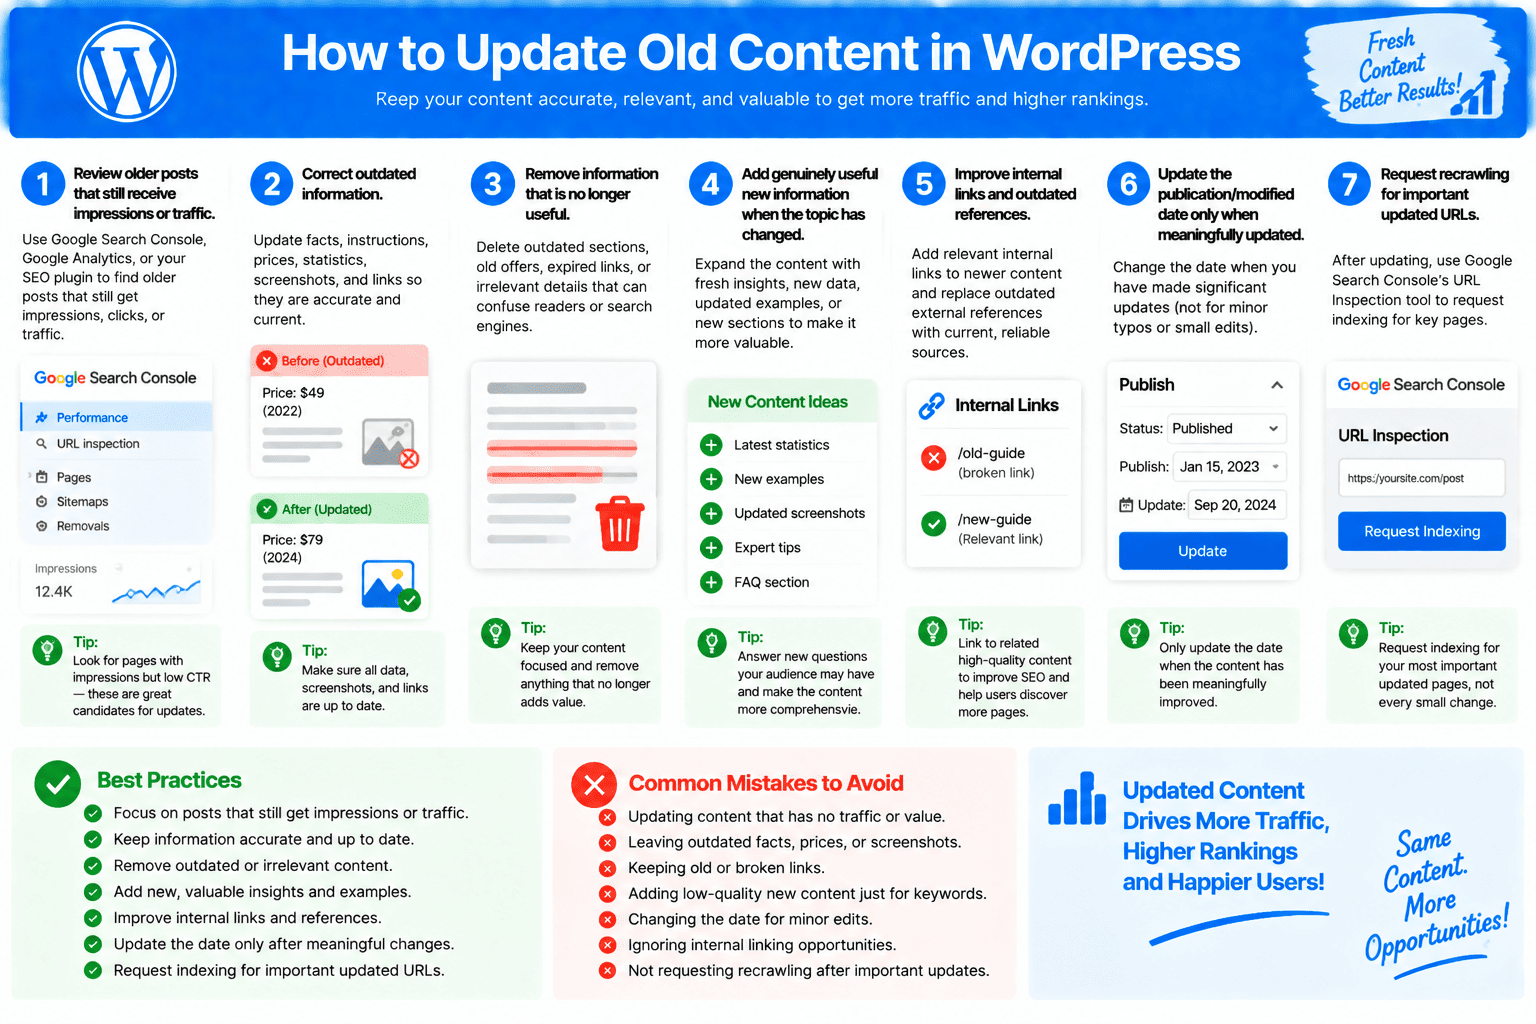
How to Update Old Content
→ Review older posts that still receive impressions or traffic.
→ Correct outdated facts, instructions, prices, statistics, screenshots, and links.
→ Remove information that is no longer useful.
→ Add genuinely useful new information when the topic has changed.
→ Improve weak internal links and outdated references.
→ Update the publication/modified date only when the content has actually been meaningfully updated.
→ Request recrawling for important updated URLs when appropriate.
Updating content should improve the article for readers, not simply change a few words to make the page appear “fresh.”
Sources
Google — SEO Starter Guide
Google — Crawling Updated Content
23. Build Quality Backlinks
Backlinks are links from other websites pointing to your pages, and they can help search engines discover content while also acting as signals about pages on the web. The safest long-term approach is to earn relevant editorial links by publishing genuinely useful resources and promoting them to appropriate audiences rather than buying links or participating in manipulative link schemes.
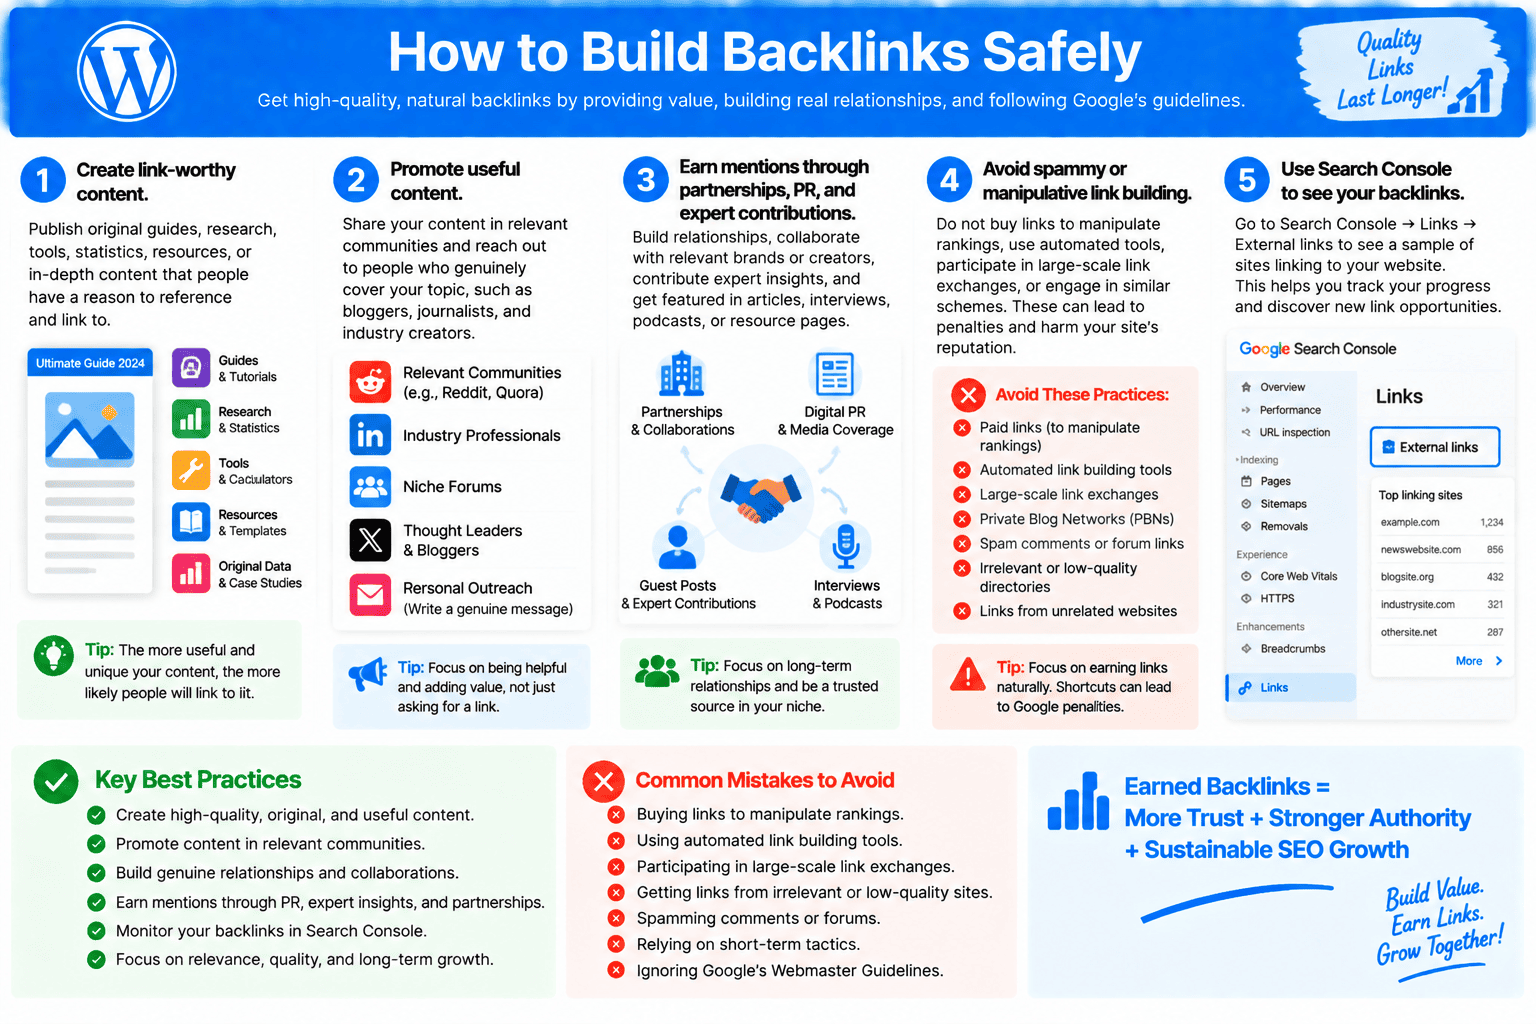
How to Build Backlinks Safely
→ Create original guides, research, tools, statistics, resources, or content people have a reason to reference.
→ Promote useful content in relevant communities and to people who genuinely cover your topic.
→ Earn mentions through partnerships, PR, expert contributions, and useful resources.
→ Avoid paid links intended to manipulate rankings, automated links, large-scale link exchanges, and similar schemes.
→ Use Search Console → Links → External links to see a sample of sites linking to your website.
Sources
Google — Getting Links Naturally
Google — Search Console Links Report
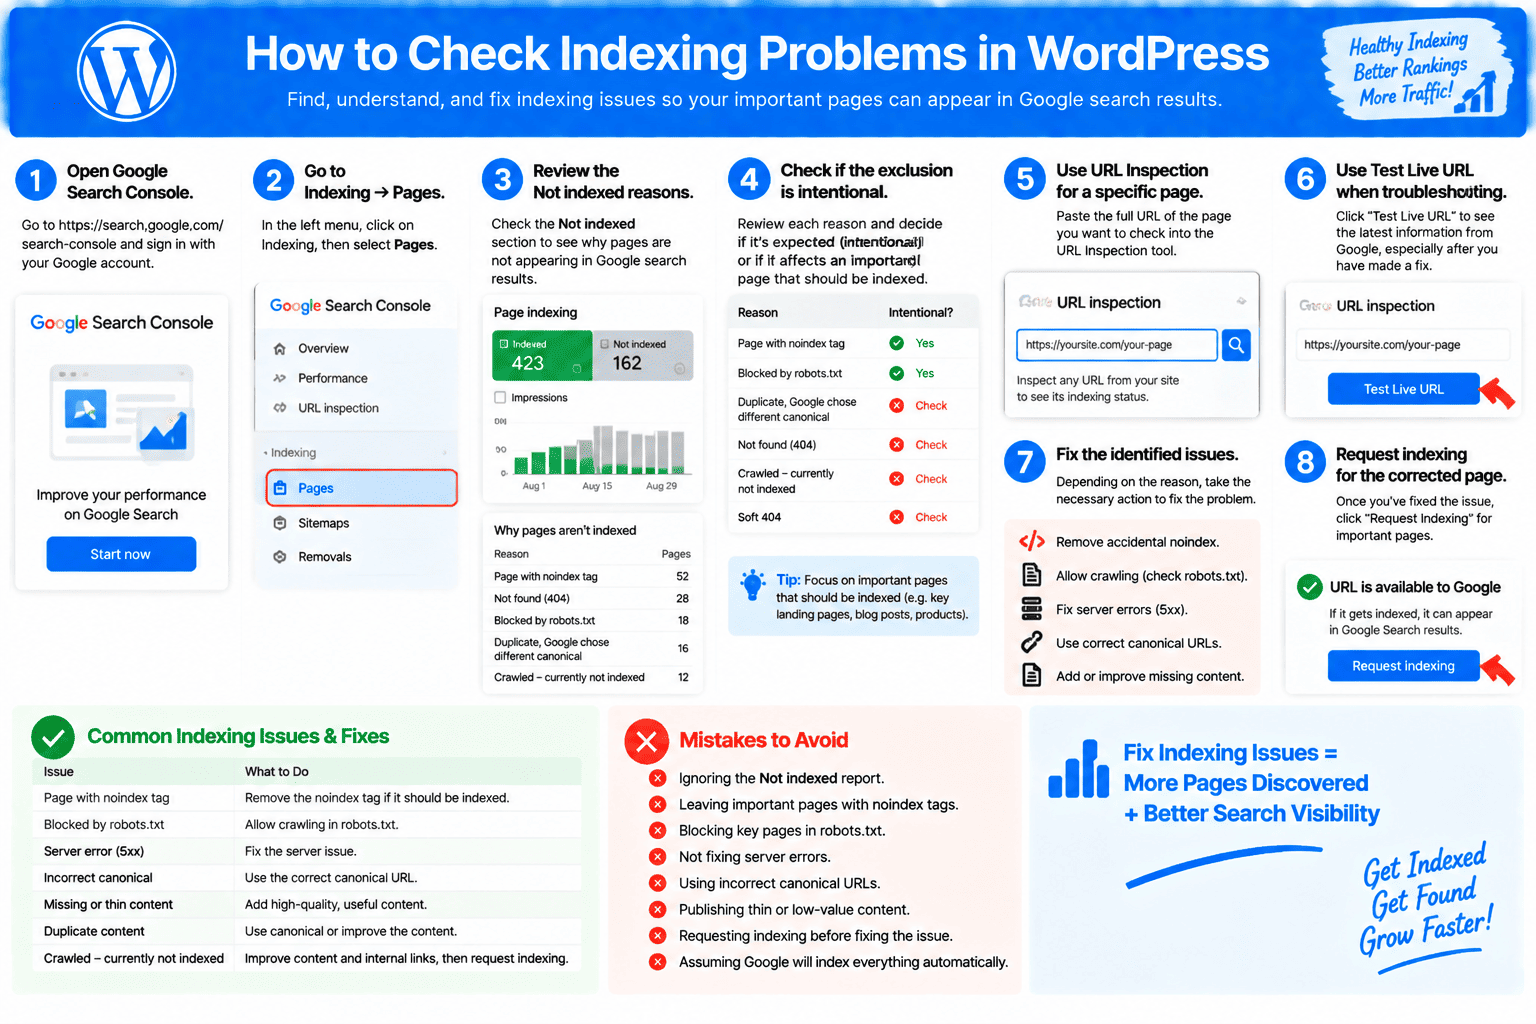
24. Check Indexing Issues
A page must normally be crawled and indexed before it can become eligible to appear in Google Search. Search Console’s Page Indexing report helps identify URLs Google has indexed, URLs it has not indexed, and the reasons behind exclusions or problems; importantly, not every non-indexed URL represents an error.
How to Check Indexing Problems
→ Step 1: Open Google Search Console.
→ Step 2: Go to Indexing → Pages.
→ Step 3: Review the Not indexed reasons.
→ Step 4: Determine whether each exclusion is intentional or affects an important page.
→ Step 5: For a specific page, paste its full URL into URL Inspection.
→ Step 6: Use Test Live URL when troubleshooting a fix.
→ Step 7: Correct issues such as accidental noindex, blocked crawling, server errors, incorrect canonicals, or missing content when applicable.
→ Step 8: Request indexing for an important corrected page when appropriate.
Do not try to force every URL on your WordPress site into Google’s index; duplicate, removed, filtered, and intentionally excluded URLs often should remain unindexed.
Sources
Google — Page Indexing Report
Google — URL Inspection Tool
25. Track Rankings and Traffic
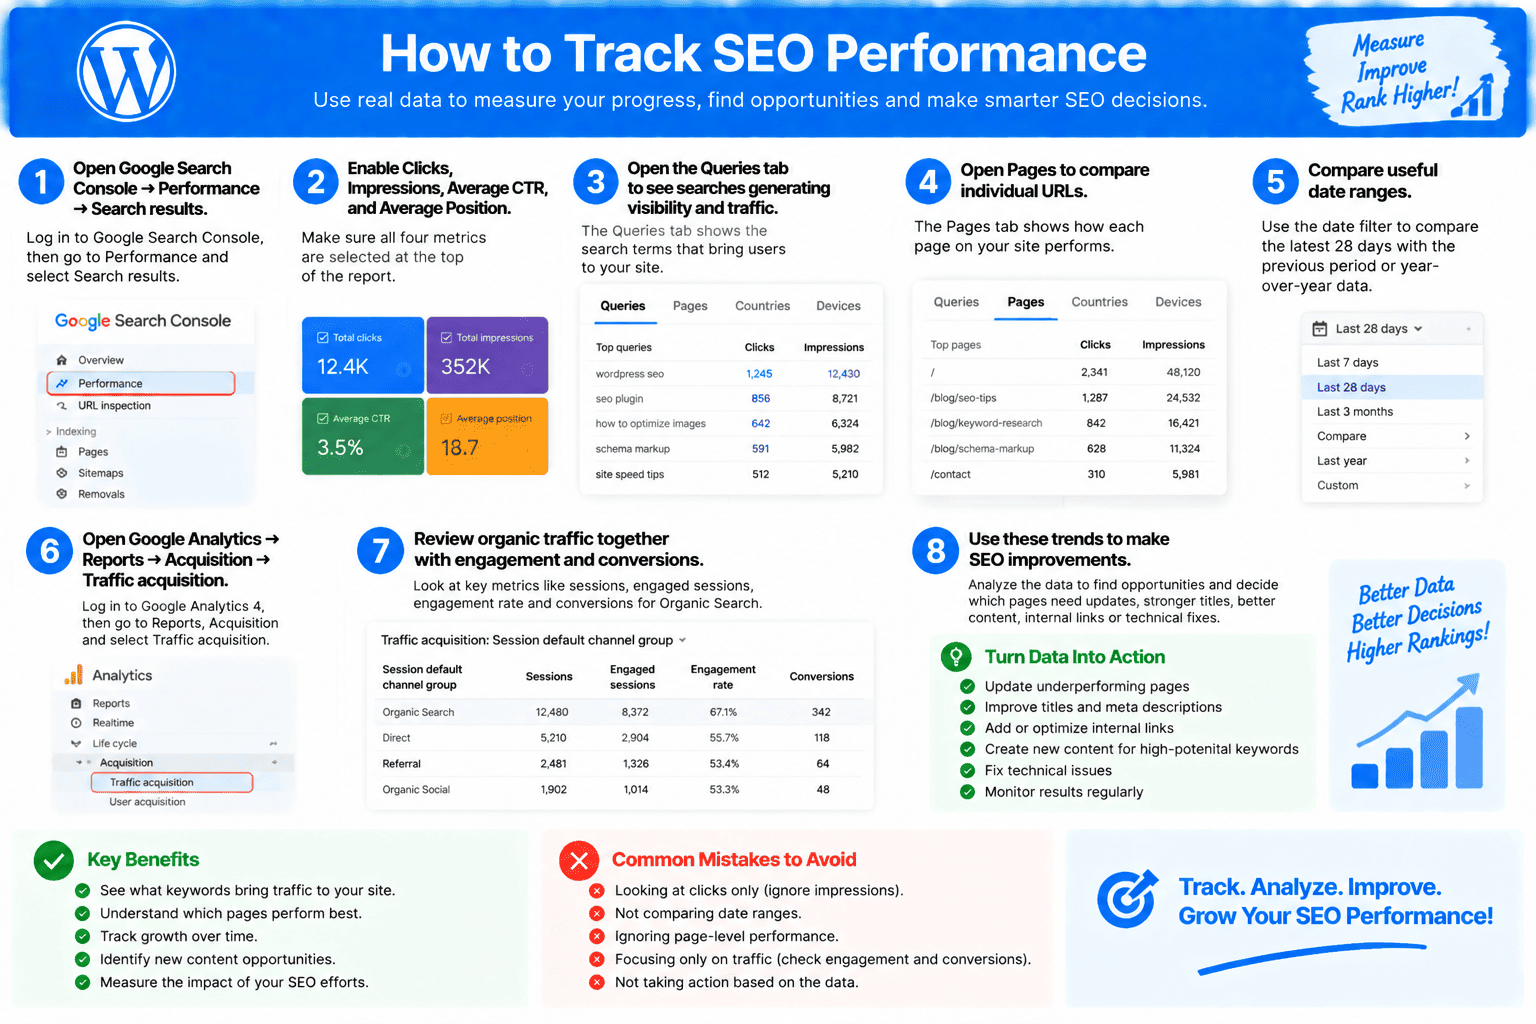
SEO improvements should be measured using real performance data instead of judging success only by manually searching your keywords. Google Search Console can show clicks, impressions, CTR, queries, pages, and average search position, while Google Analytics can show how organic visitors behave after arriving on your website.
Remember that Search Console’s average position is an aggregated metric rather than one permanent ranking number because search results can vary by location, device, time, and other search context.
How to Track SEO Performance
→ Step 1: Open Google Search Console → Performance → Search results.
→ Step 2: Enable Clicks, Impressions, Average CTR, and Average Position.
→ Step 3: Open the Queries tab to see searches generating visibility and traffic.
→ Step 4: Open Pages to compare individual URLs.
→ Step 5: Compare useful date ranges such as the latest 28 days against the previous period or year-over-year data.
→ Step 6: Open Google Analytics → Reports → Acquisition → Traffic acquisition.
→ Step 7: Review organic traffic together with engagement and conversion results.
→ Step 8: Use these trends to decide which pages need updating, stronger titles, improved content, better internal linking, or technical fixes.
Sources
Google — Search Console Performance Report
Google Analytics — Traffic Acquisition Report
Final WordPress SEO Checklist
A strong WordPress SEO setup combines accessible technical foundations, useful content, clear page signals and ongoing measurement. Complete the foundational tasks first, then improve individual pages and review performance regularly.
| Before publishing | After publishing |
|---|---|
| Confirm indexing, URL, title, meta description, headings, images, internal links and schema. | Check indexing, Core Web Vitals, search queries, backlinks, engagement and conversions. |
| Preview desktop and mobile layouts. | Update outdated information and repair broken links. |
Continue with the complete backlink guide to strengthen authority after your on-page and technical foundations are ready.

Leave a Reply